


I’ve been testing out different Halloween makeup directions this month and a few of them surprised me.
Some lean into sharp graphic lines around the eyes while others use softer color washes that still read as costume without much effort.
What stands out is how many of these ideas build on everyday products you probably already own rather than demanding a whole new kit.
A couple even work if you want something bold but still recognizable when you’re out with friends who aren’t doing full looks.
It’s nice seeing options that feel current instead of the same old templates.
Cracked Porcelain Makeup
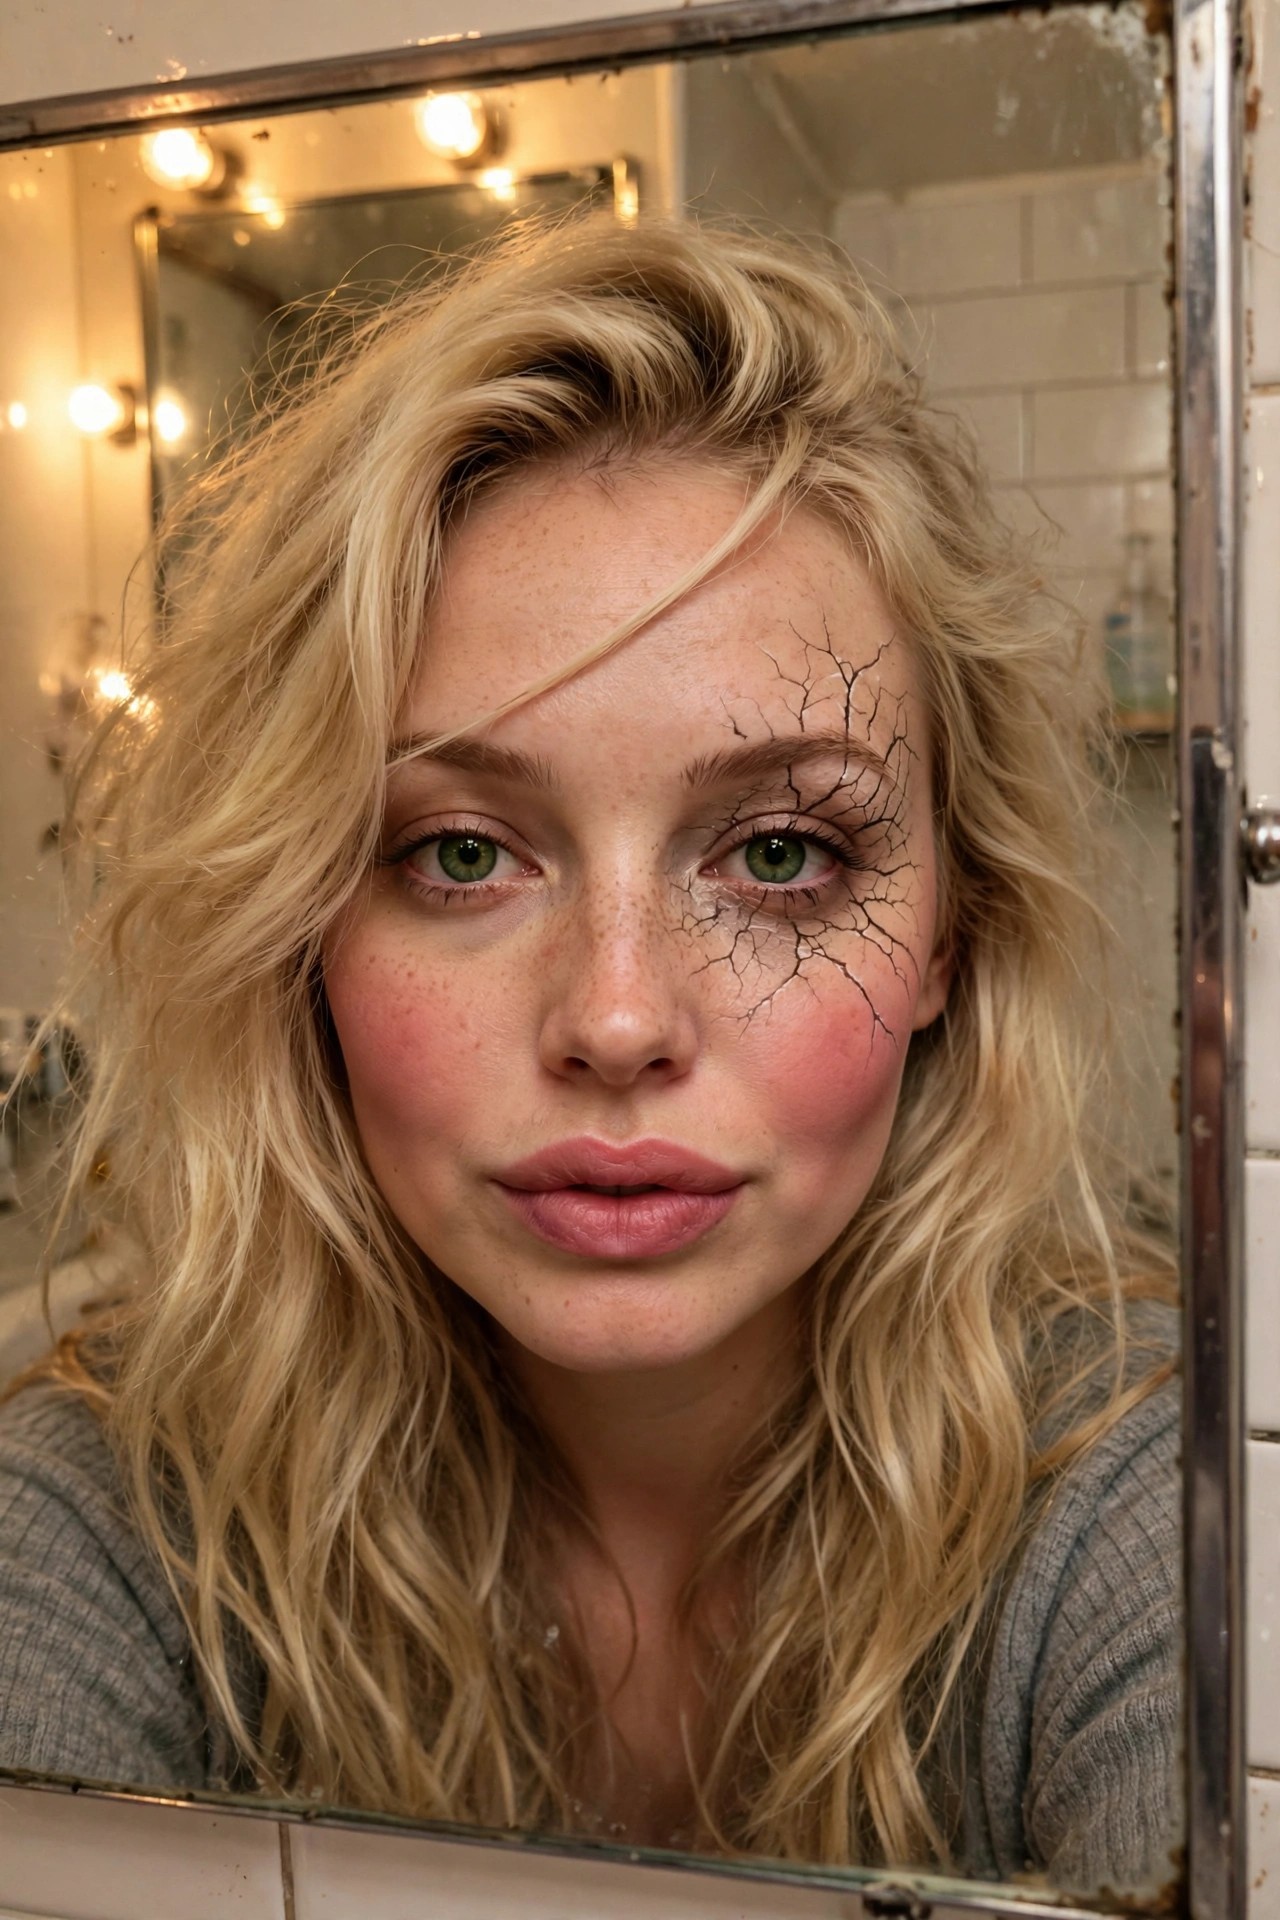
I keep coming back to how the black lines actually fracture across the skin. They start tight around the eye and then spread outward in uneven branches, almost like the surface just gave way. The effect sits right on top of her natural freckles and blush instead of covering them completely, which makes the whole thing feel less like stage paint and more like something that happened to her face.
The placement is what sells it. One side stays mostly untouched while the other carries the full crack pattern, and that imbalance keeps it from looking too symmetrical or costume-y. It still reads as wearable even though the lines are dramatic. I like that it works with whatever hair and lip color you already have instead of demanding a full overhaul.
Rhinestone Sugar Skull Eye Makeup
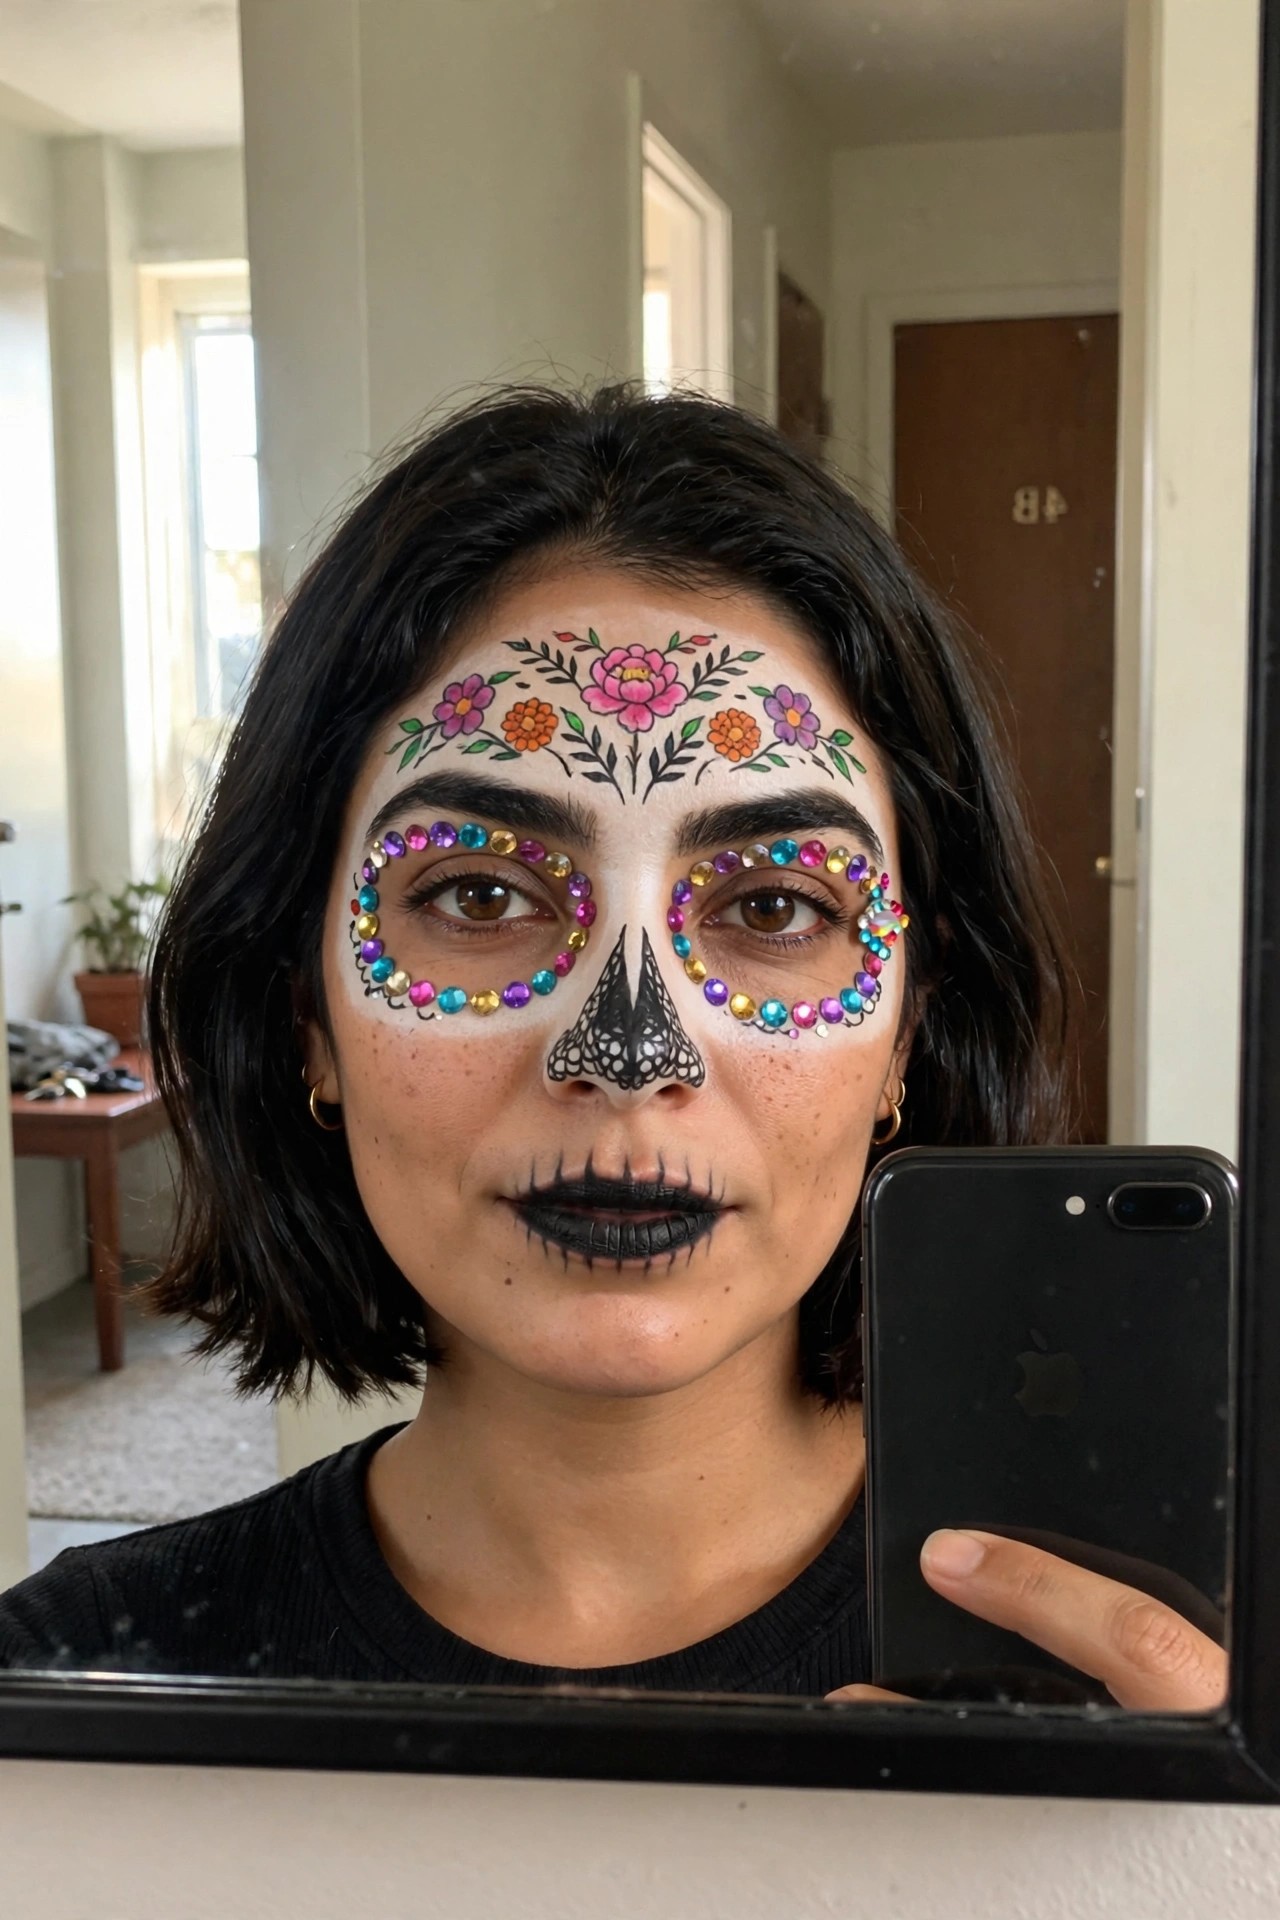
This one caught my eye right away because of how the rhinestones sit around the eyes. They form almost perfect circles with every color mixed in, and the black nose paint underneath pulls the whole skull shape together without needing heavy lines everywhere.
The forehead flowers feel like the real detail that makes it different from a basic skull look. Pink, orange, and purple blooms with little green leaves spread across the brow area, and the black lip lines at the bottom keep the skeletal feel balanced instead of just pretty.
I like that the design stays wearable for a night out while still reading clearly as sugar skull. The gems add that extra sparkle without covering the whole face, so it feels approachable if you want something more than plain black and white.
Galaxy Star Makeup
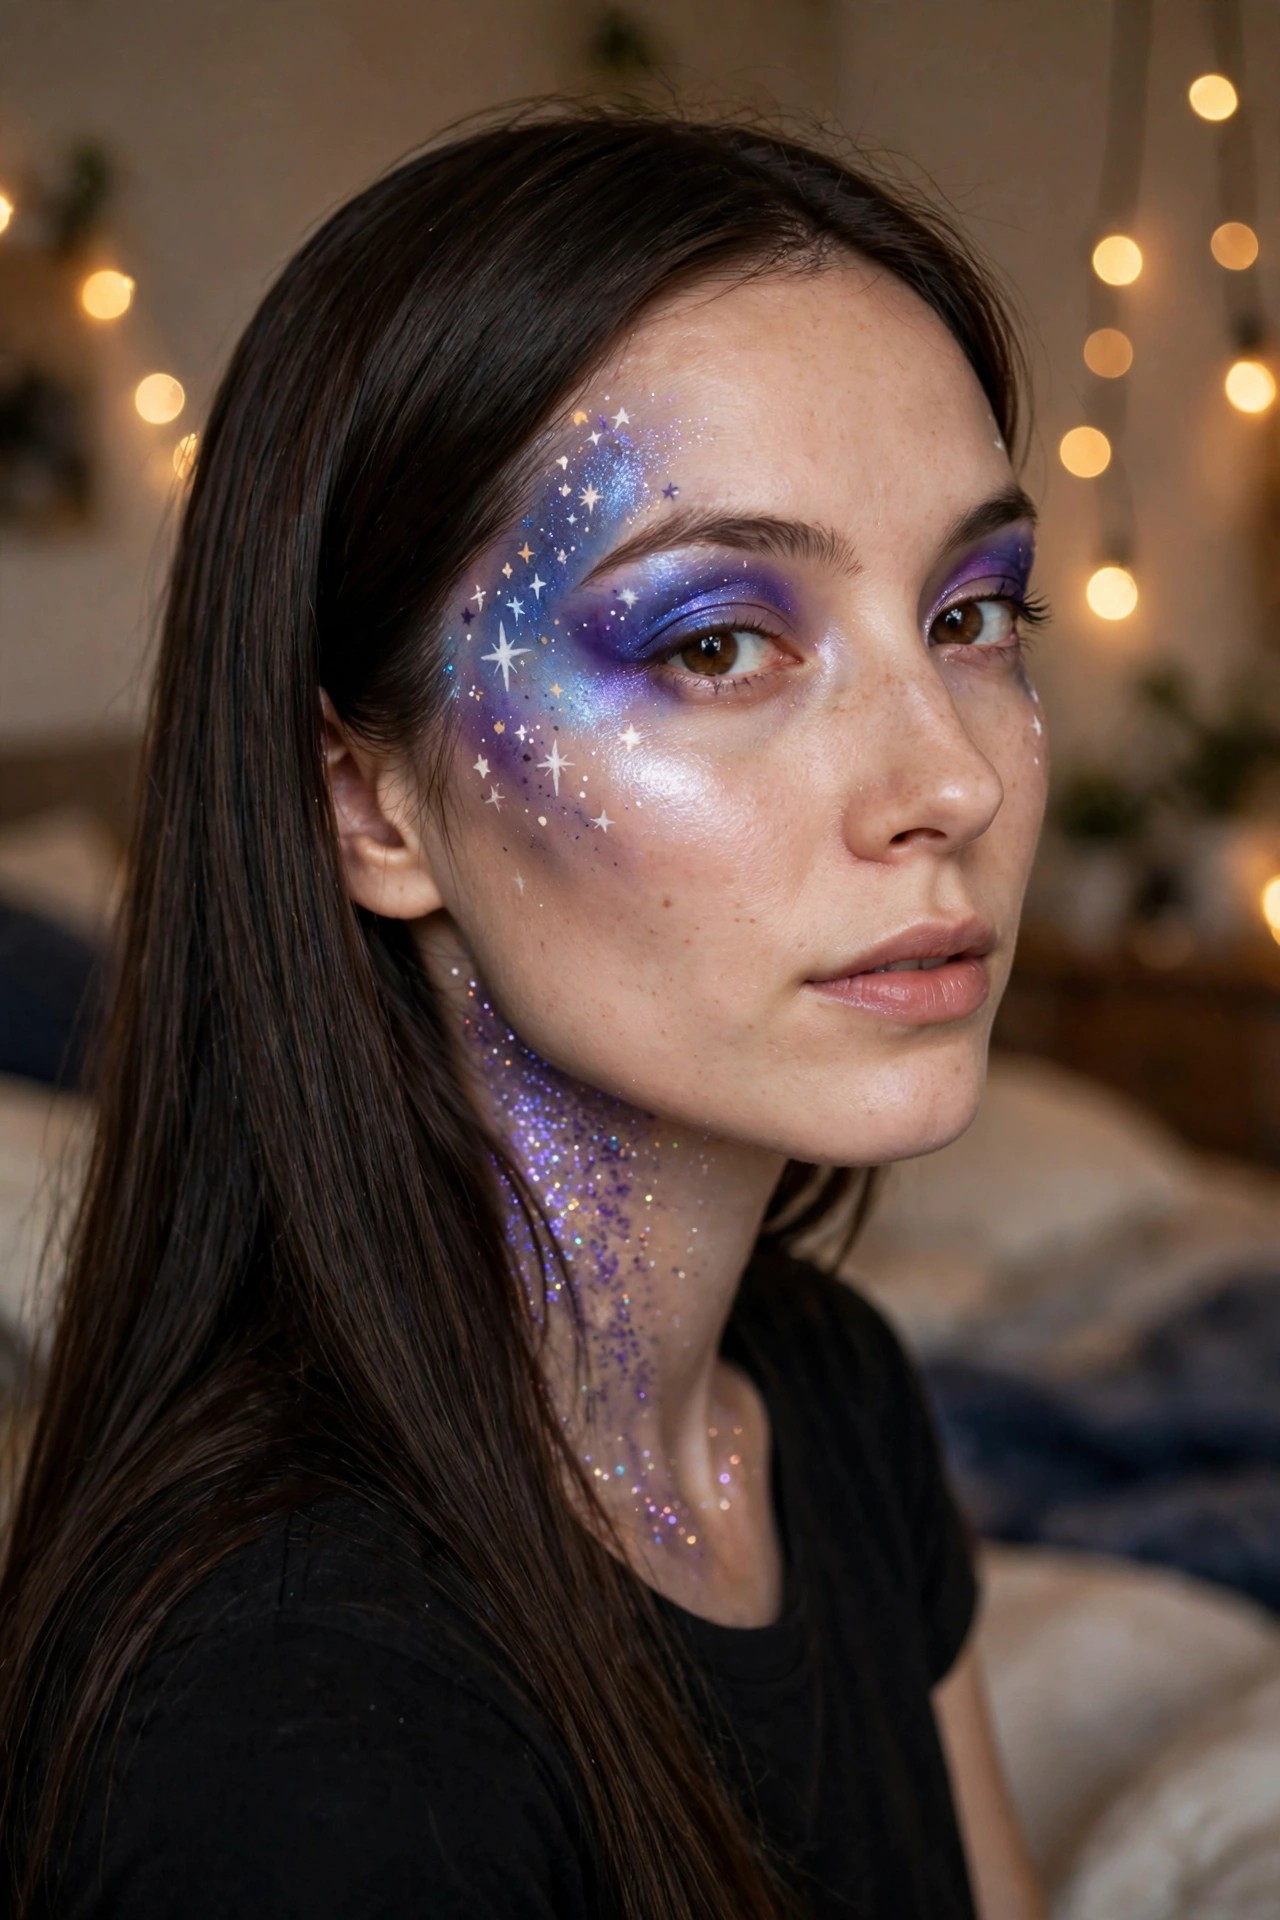
This makeup design covers the eye area in a deep purple to blue gradient with a soft shimmer finish. The look extends outward onto the cheek with scattered white stars of varying sizes and a fine layer of glitter that catches the light. Smaller dots and sparkles continue down the side of the neck, creating a continuous starry effect.
The placement feels deliberate rather than random. Larger star shapes sit near the temple while smaller ones trail toward the cheekbone, and the glitter density is heavier right under the eye before it thins out lower on the face. The overall result reads as a night sky without needing any extra props or accessories.
Dark Purple Smoky Eye And Dripping Lip Makeup

This makeup leans into a bruised, almost decaying vibe that still feels polished. The eyes are packed with deep purple and black shadow that extends outward and down the cheeks in soft smudges. Small dark flecks scattered across the skin add to the effect without looking too literal.
The lips are where the look really lands. A glossy dark plum shade is applied thick enough that it drips in two thin trails from the center of the bottom lip. The color stays rich even as it runs, which keeps the whole thing from reading as just messy. I like how the eyes and mouth balance each other instead of one overpowering the other.
It feels like something you could build gradually if you already have a smoky eye palette and a dark lip gloss. The placement is forgiving enough that small variations still read as intentional.
Neon Spiderweb Eye Makeup
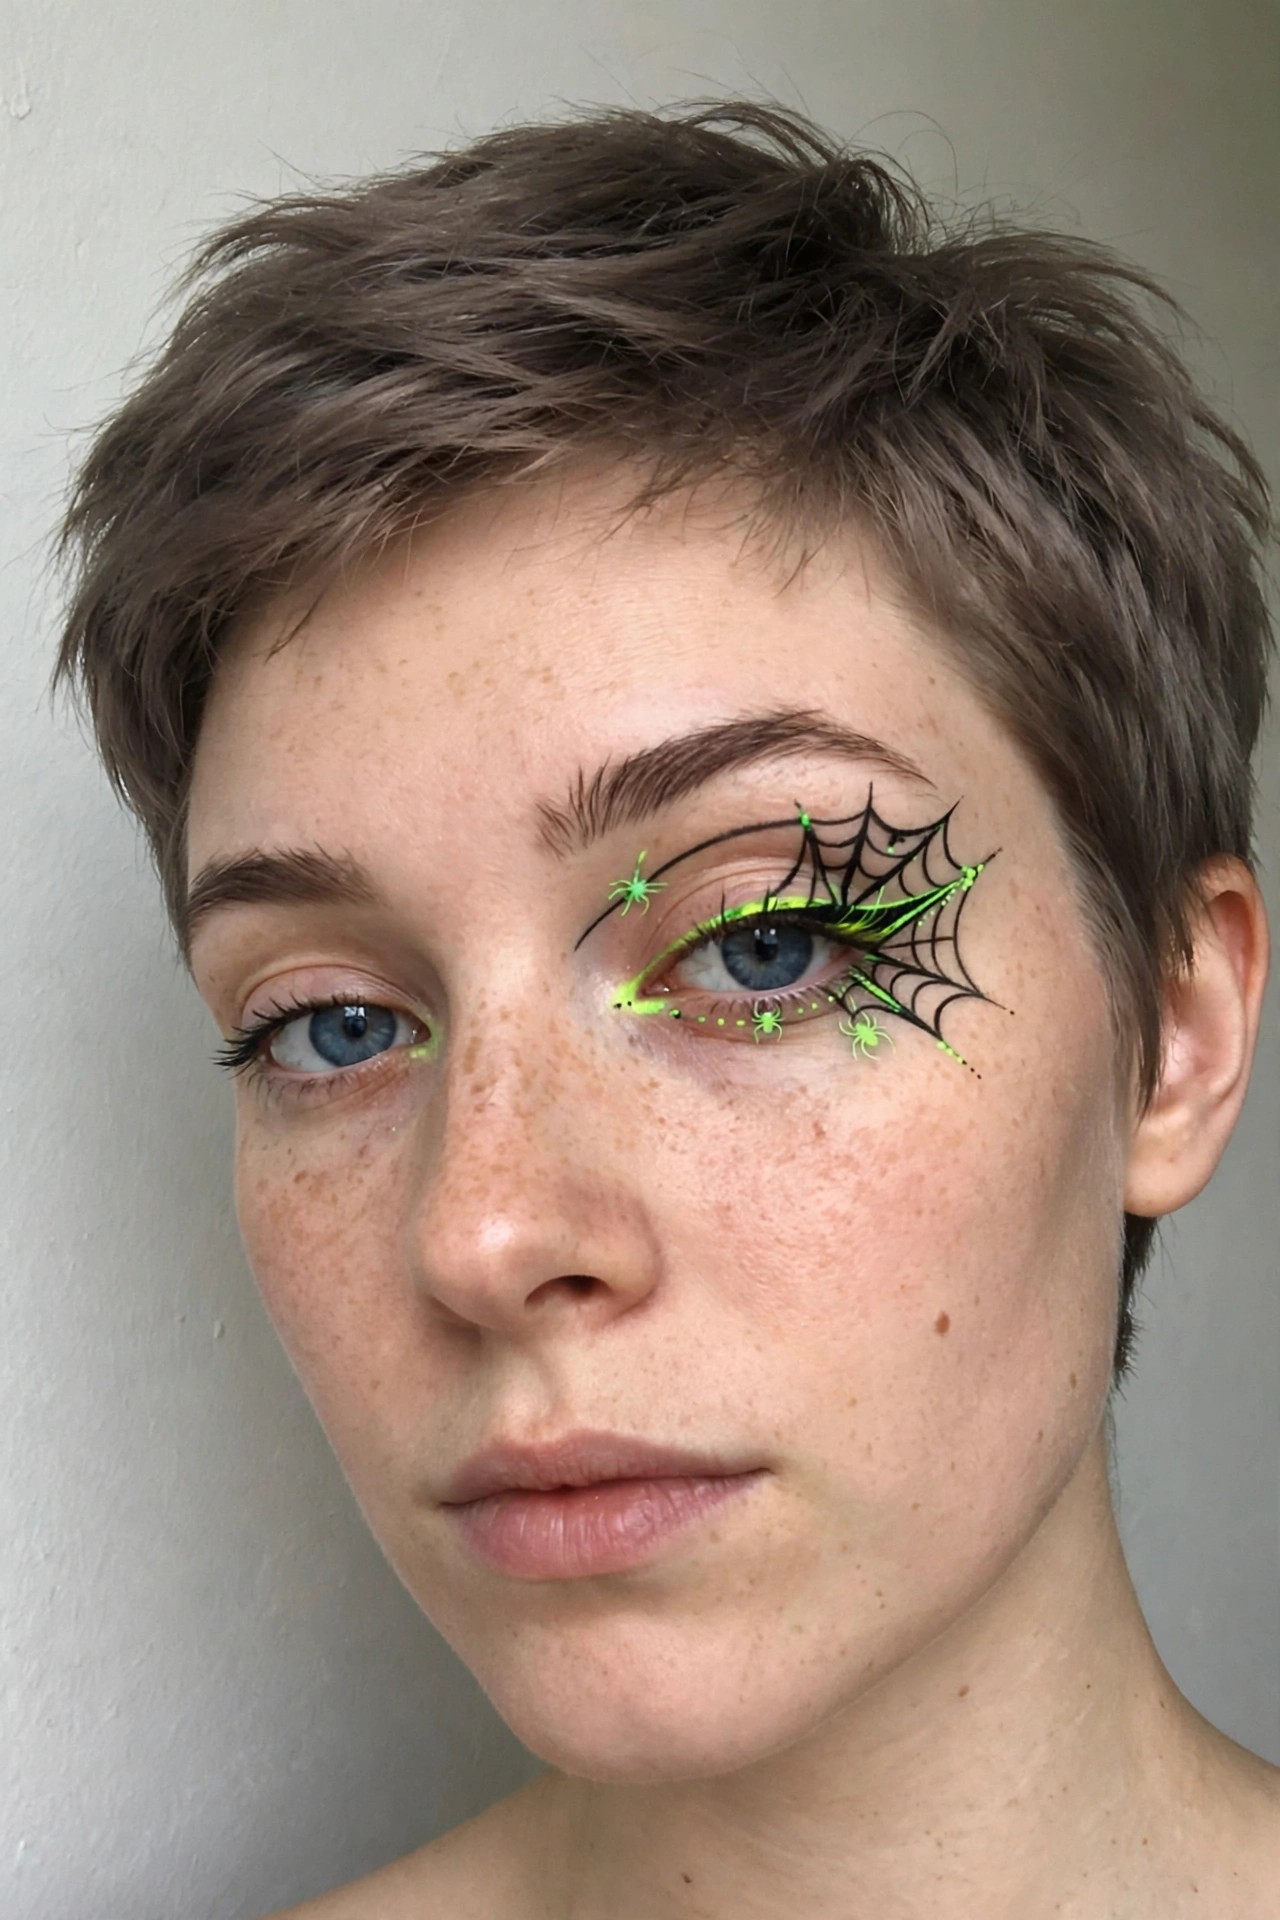
I keep coming back to how clean the lines are on this one. The black spiderweb stretches across the lid and out toward the temple without looking messy, and the neon green really pops against the skin. Those tiny spiders placed along the web feel like the right amount of detail without overcrowding the look.
What stands out most is the way the color moves. The bright green liner sits right along the lash line and then extends into the web itself, so the whole design feels connected rather than like separate pieces. The dotted line underneath adds a little extra structure and keeps the eye from getting lost in all the black.
It is the kind of makeup that reads clearly even from a distance, which makes it practical if you are going to be at a party or taking photos. The short hair keeps everything focused on the eye, so nothing competes with the design.
Half Skull Face Paint
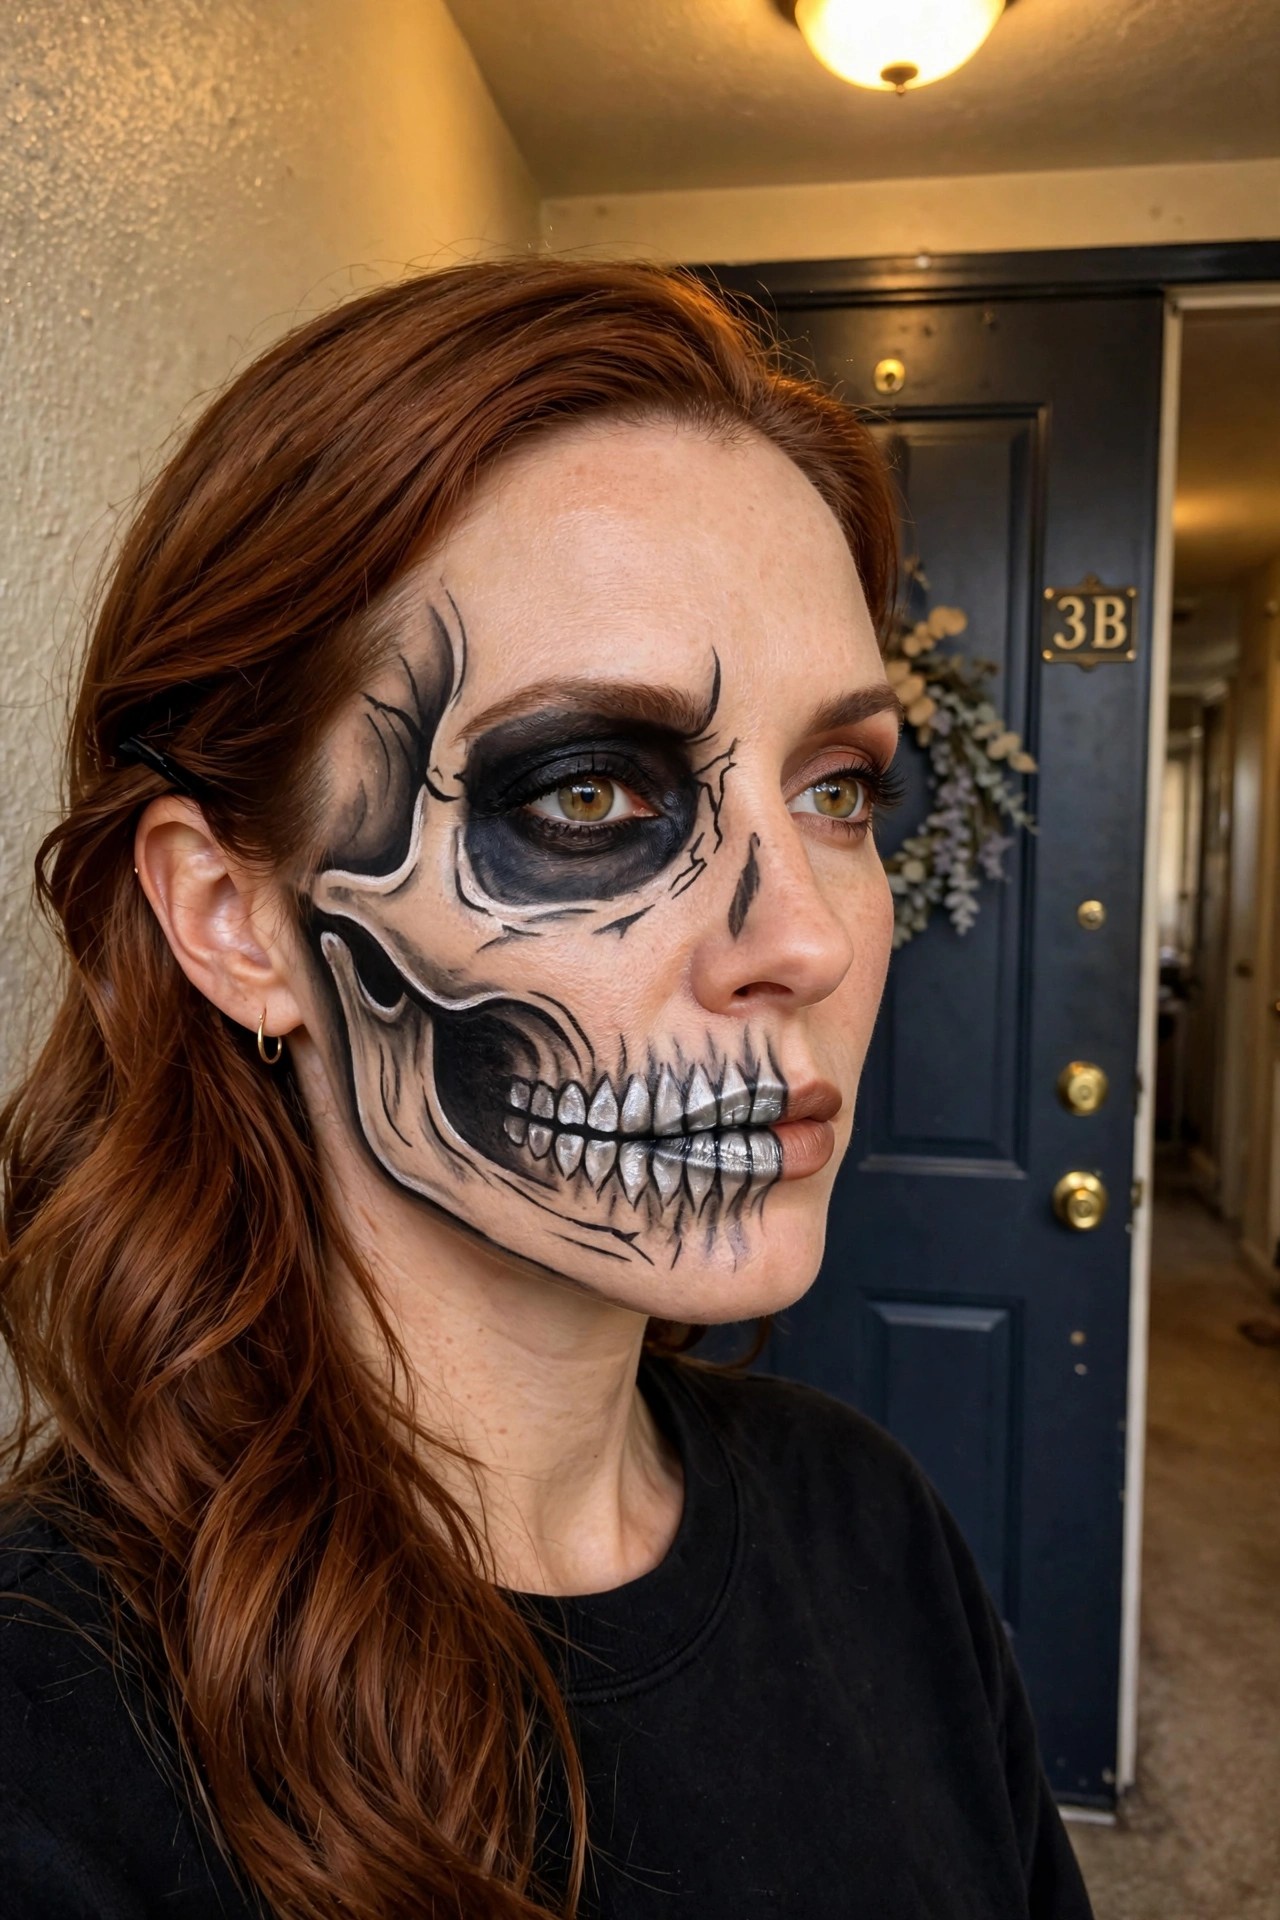
This one caught my attention right away because of how cleanly the skull design takes over just one side of the face. The blacked out eye socket and the exposed teeth are painted with enough contrast that the bone structure really reads from a distance. I like the way the cracks trail up toward the brow and down along the jaw without feeling overly busy.
The metallic silver on the teeth adds a nice touch of dimension too. It keeps the look from going completely flat while still staying true to a classic skeleton vibe. The transition line down the center of the face is sharp enough to make the two sides feel intentional rather than messy.
Silver Moon Face Paint
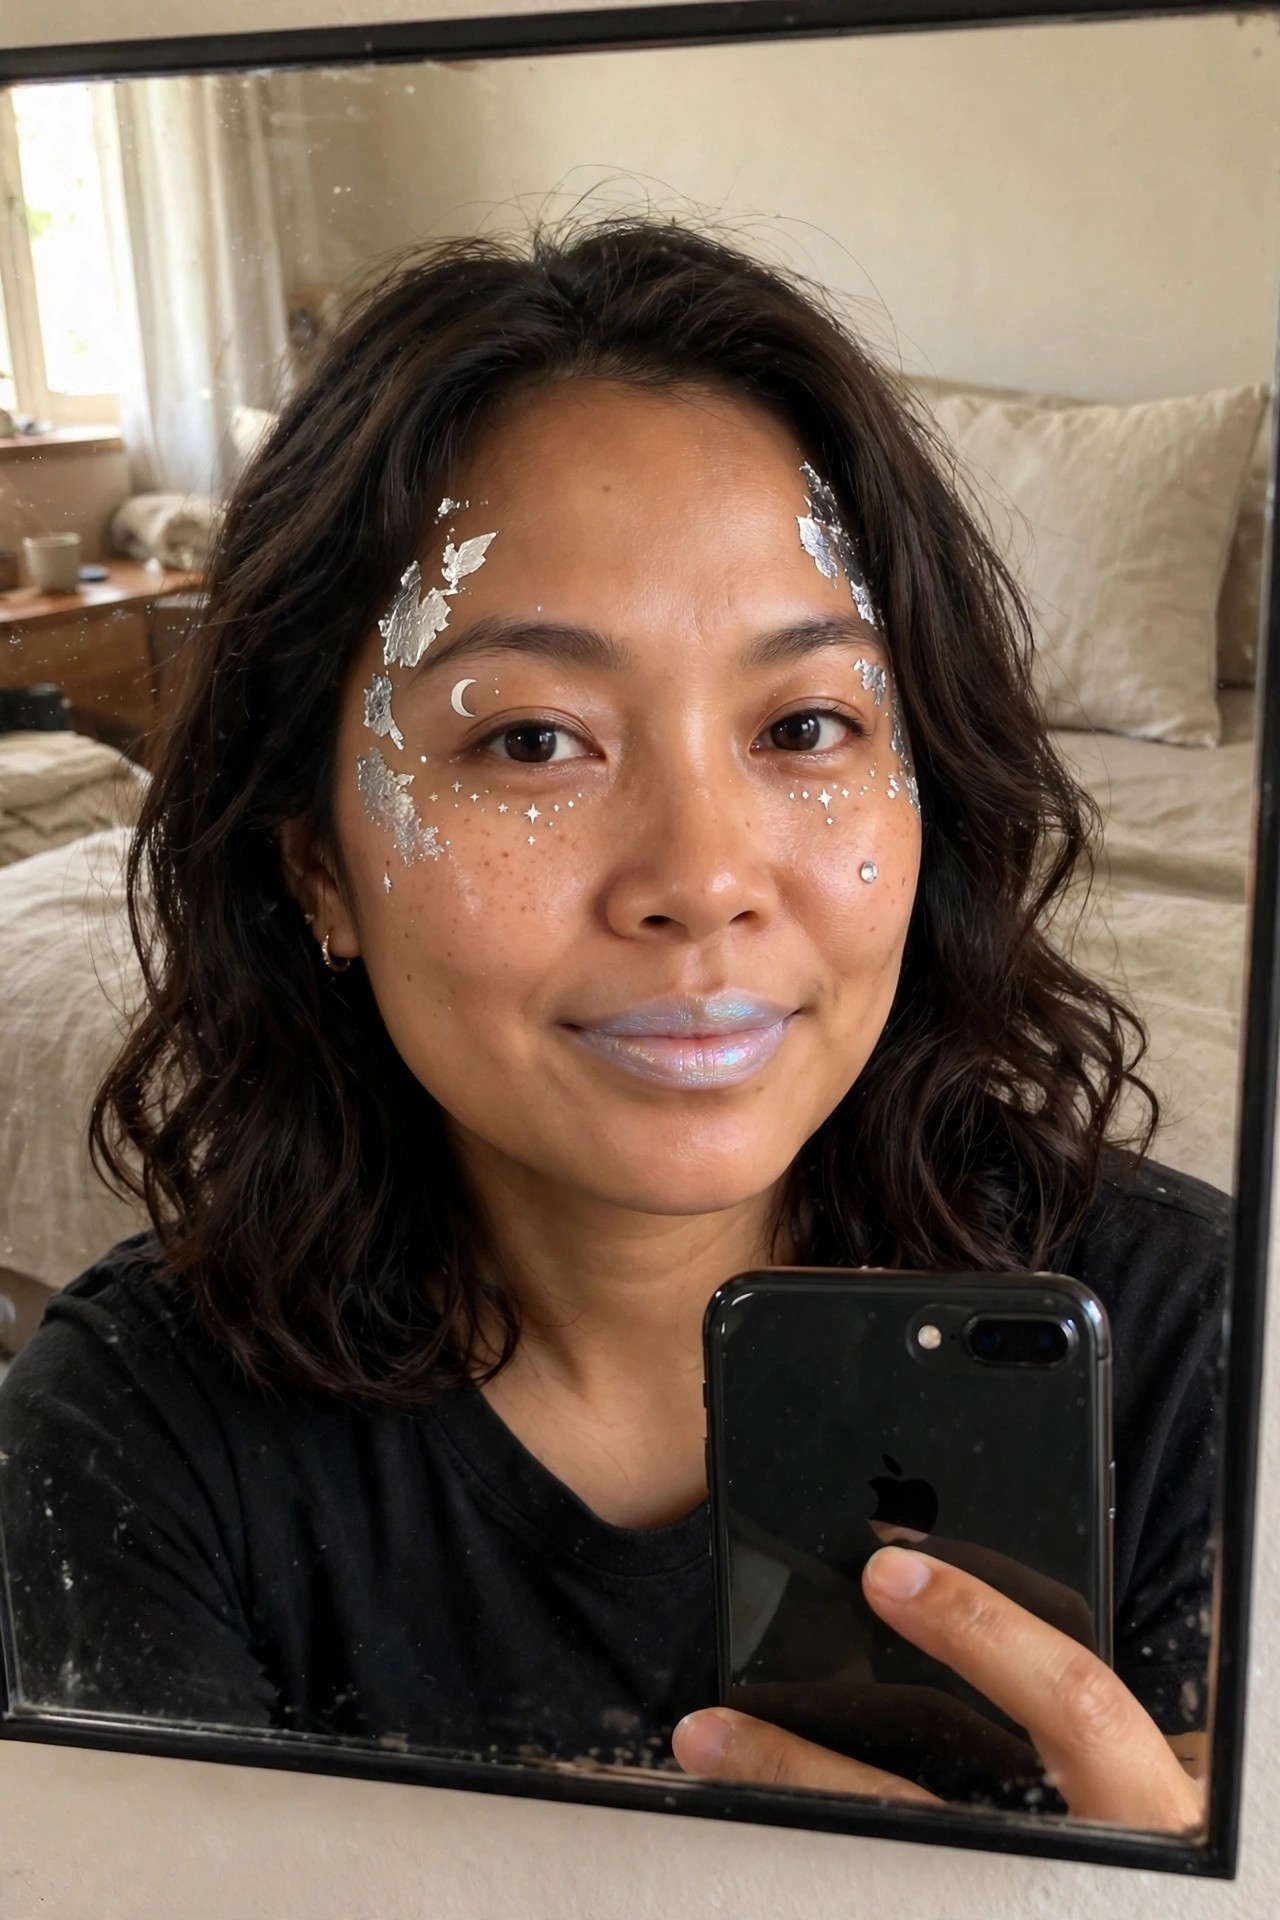
I keep coming back to how simple yet striking this one feels. The silver foil pieces sit across the forehead and cheek like scattered moonlight, and that little crescent moon with the tiny stars really pulls the whole thing together. It is not trying too hard, which makes it feel wearable even if you are not going for full costume drama.
The glitter on the lips adds a soft shine that catches the light without overpowering the rest of the face. One small jewel near the cheekbone gives just enough extra sparkle. I like that the design stays mostly on one side, leaving the other side cleaner. It keeps the look balanced instead of busy.
If you wanted something quick but still festive, this seems like a good option. The foil tears easily and the moon shape is simple to draw once you have the base color down.
Stitched Cheek Makeup Design
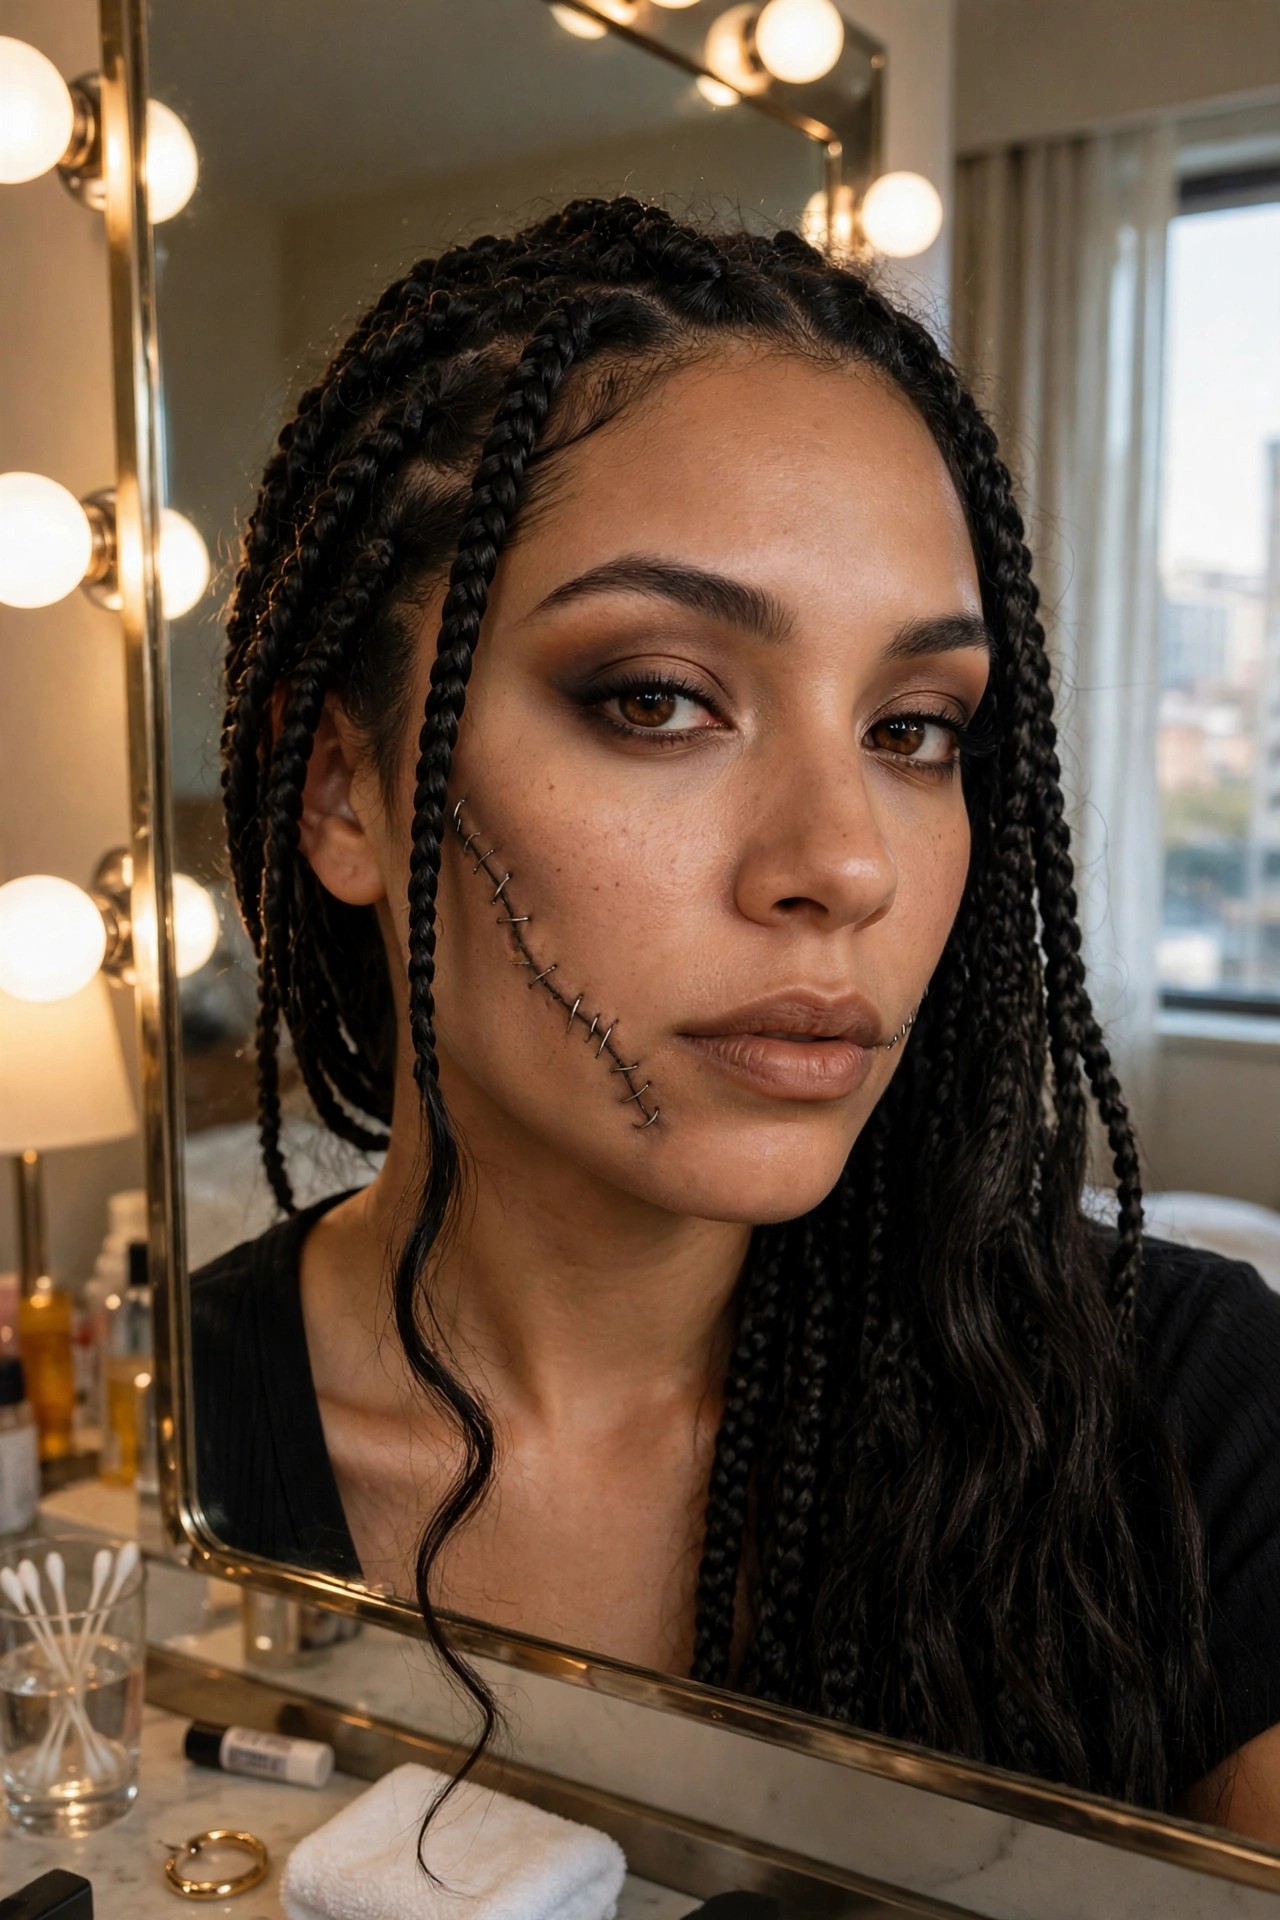
This makeup takes a simple graphic idea and makes it the whole point. A row of small black stitches runs along the cheek and curves toward the jaw, looking like skin that has been sewn shut. The placement sits right where it catches the light, so the detail reads clearly without needing extra layers of blood or shading.
The rest of the face stays relatively clean so the stitches stay the center of attention. Smoky eyes and a soft lip keep everything balanced, but the stitch line is what turns the look into something Halloween specific. It feels precise enough that it could work for a last minute plan if you already have the right liner or small prosthetic pieces on hand.
I keep coming back to how the angle of the stitches follows the natural curve of the face. That small choice makes the whole design feel more intentional than if they had been placed straight across.
Orange and Black Watercolor Eye Makeup

This eye design caught my attention right away because of how the colors bleed together like ink on paper. The orange sits bright against the black splatters and it almost looks like flames spreading outward from the lash line. The placement feels intentional but still loose enough that it reads more like an artistic experiment than a strict graphic line.
I like the way the rhinestones trail along the brow bone and up toward the forehead. They catch the light without overpowering the paint underneath. The look stays focused on the eyes while still using the surrounding skin as part of the canvas.
It feels wearable for someone who wants something bold but not completely covered in face paint. The colors are classic Halloween without needing extra props or heavy layers.
Metallic Circuit Board Eye Makeup
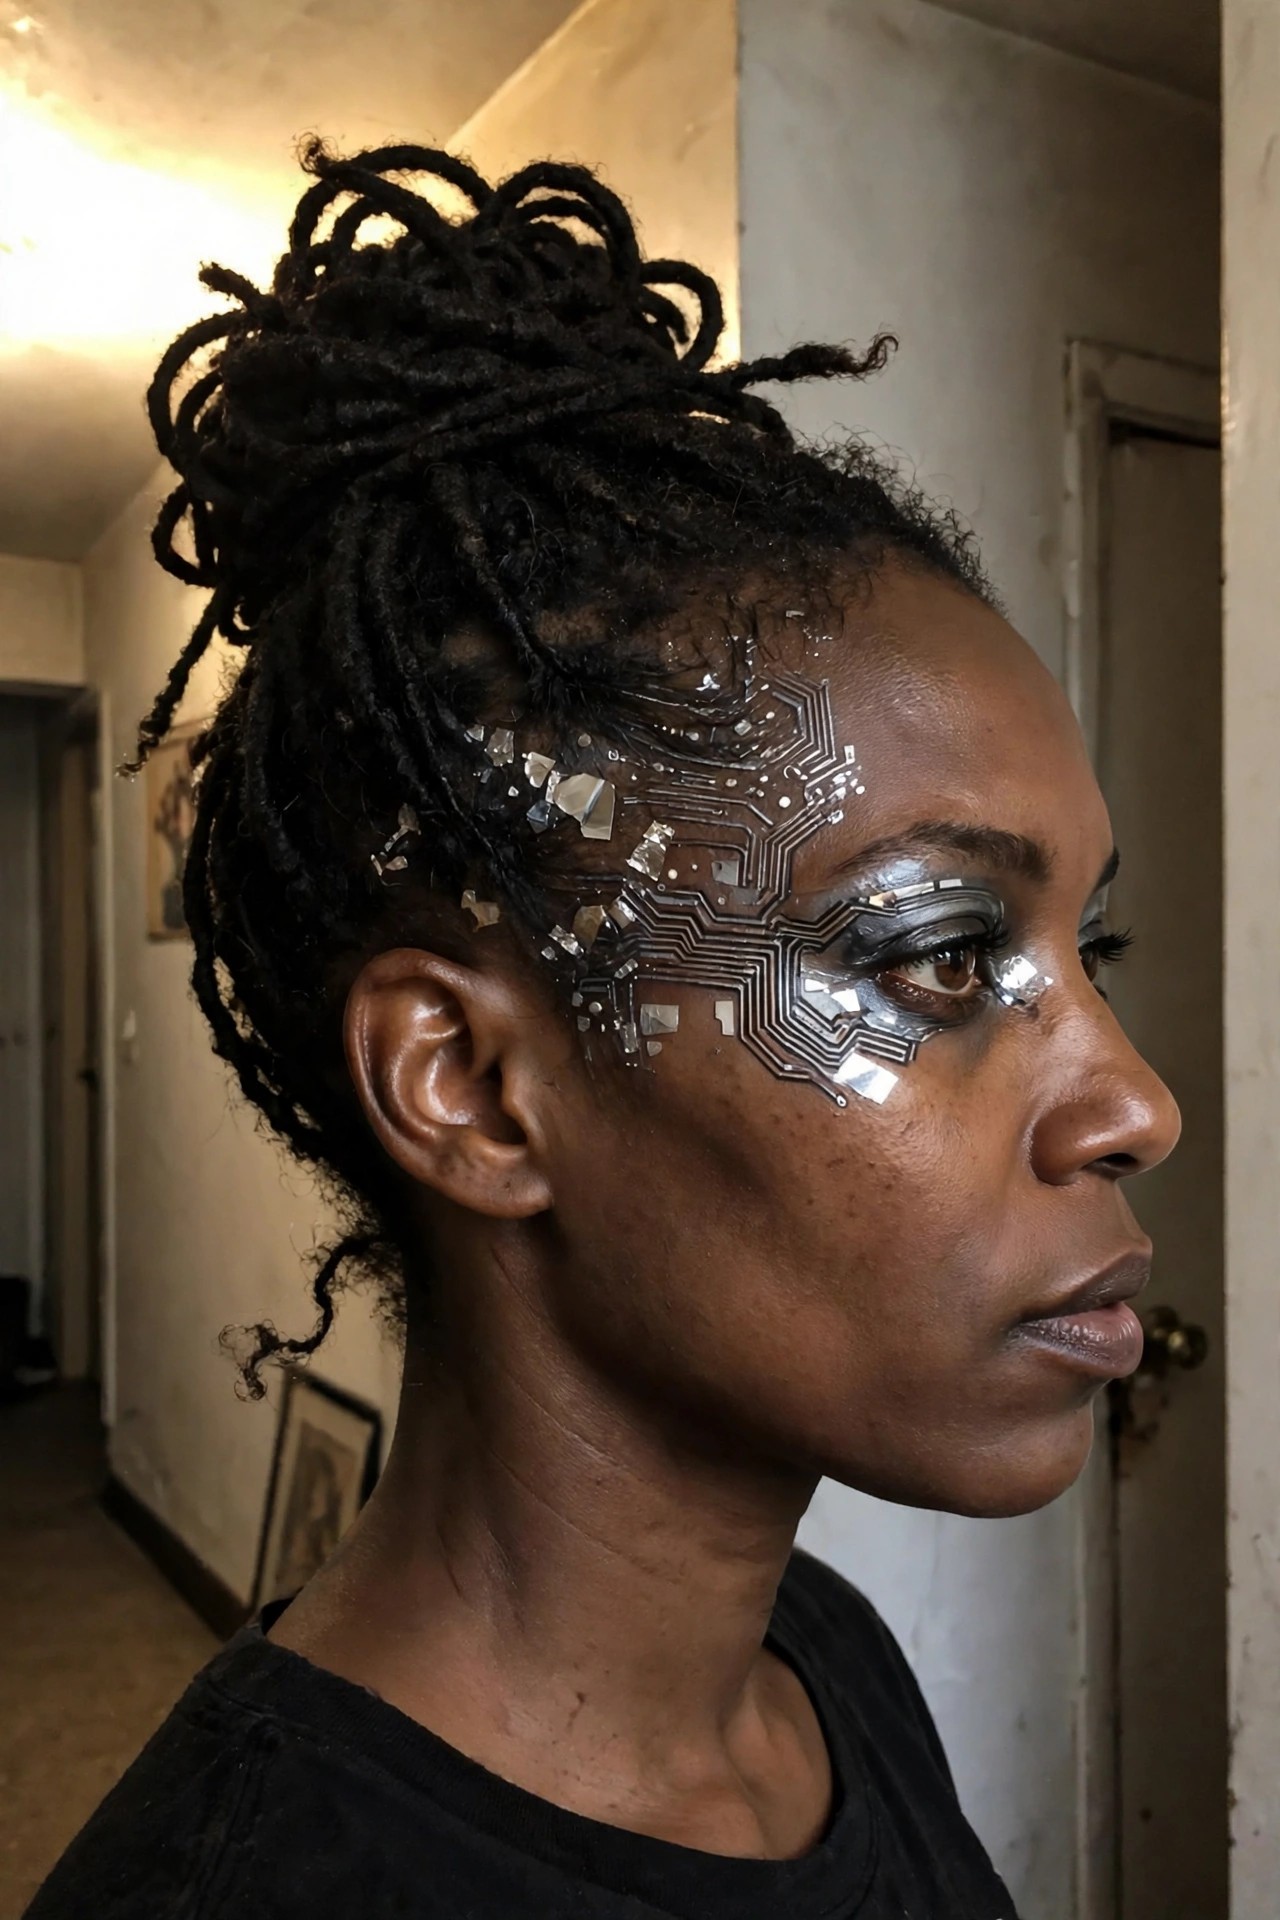
This one caught me right away because the design feels so precise yet a little rough around the edges. The silver circuit patterns stretch from the temple down toward the eye, with small metallic fragments scattered like broken pieces of tech. It gives off that half human half machine vibe without needing any extra props or big gestures.
What I like is how the lines stay clean on the outer part but start to look fragmented closer to the eye. The metallic pieces catch light in a way that makes the whole thing shift as the head moves. It feels wearable enough for a party but still reads as a full Halloween idea once you get close.
I keep thinking about how simple the base is, just the silver tones and the circuit lines, yet it still stands out. You could probably build on it with more chrome accents or keep it exactly like this if you wanted something striking without a ton of layers.
Crescent Moon Eye Makeup
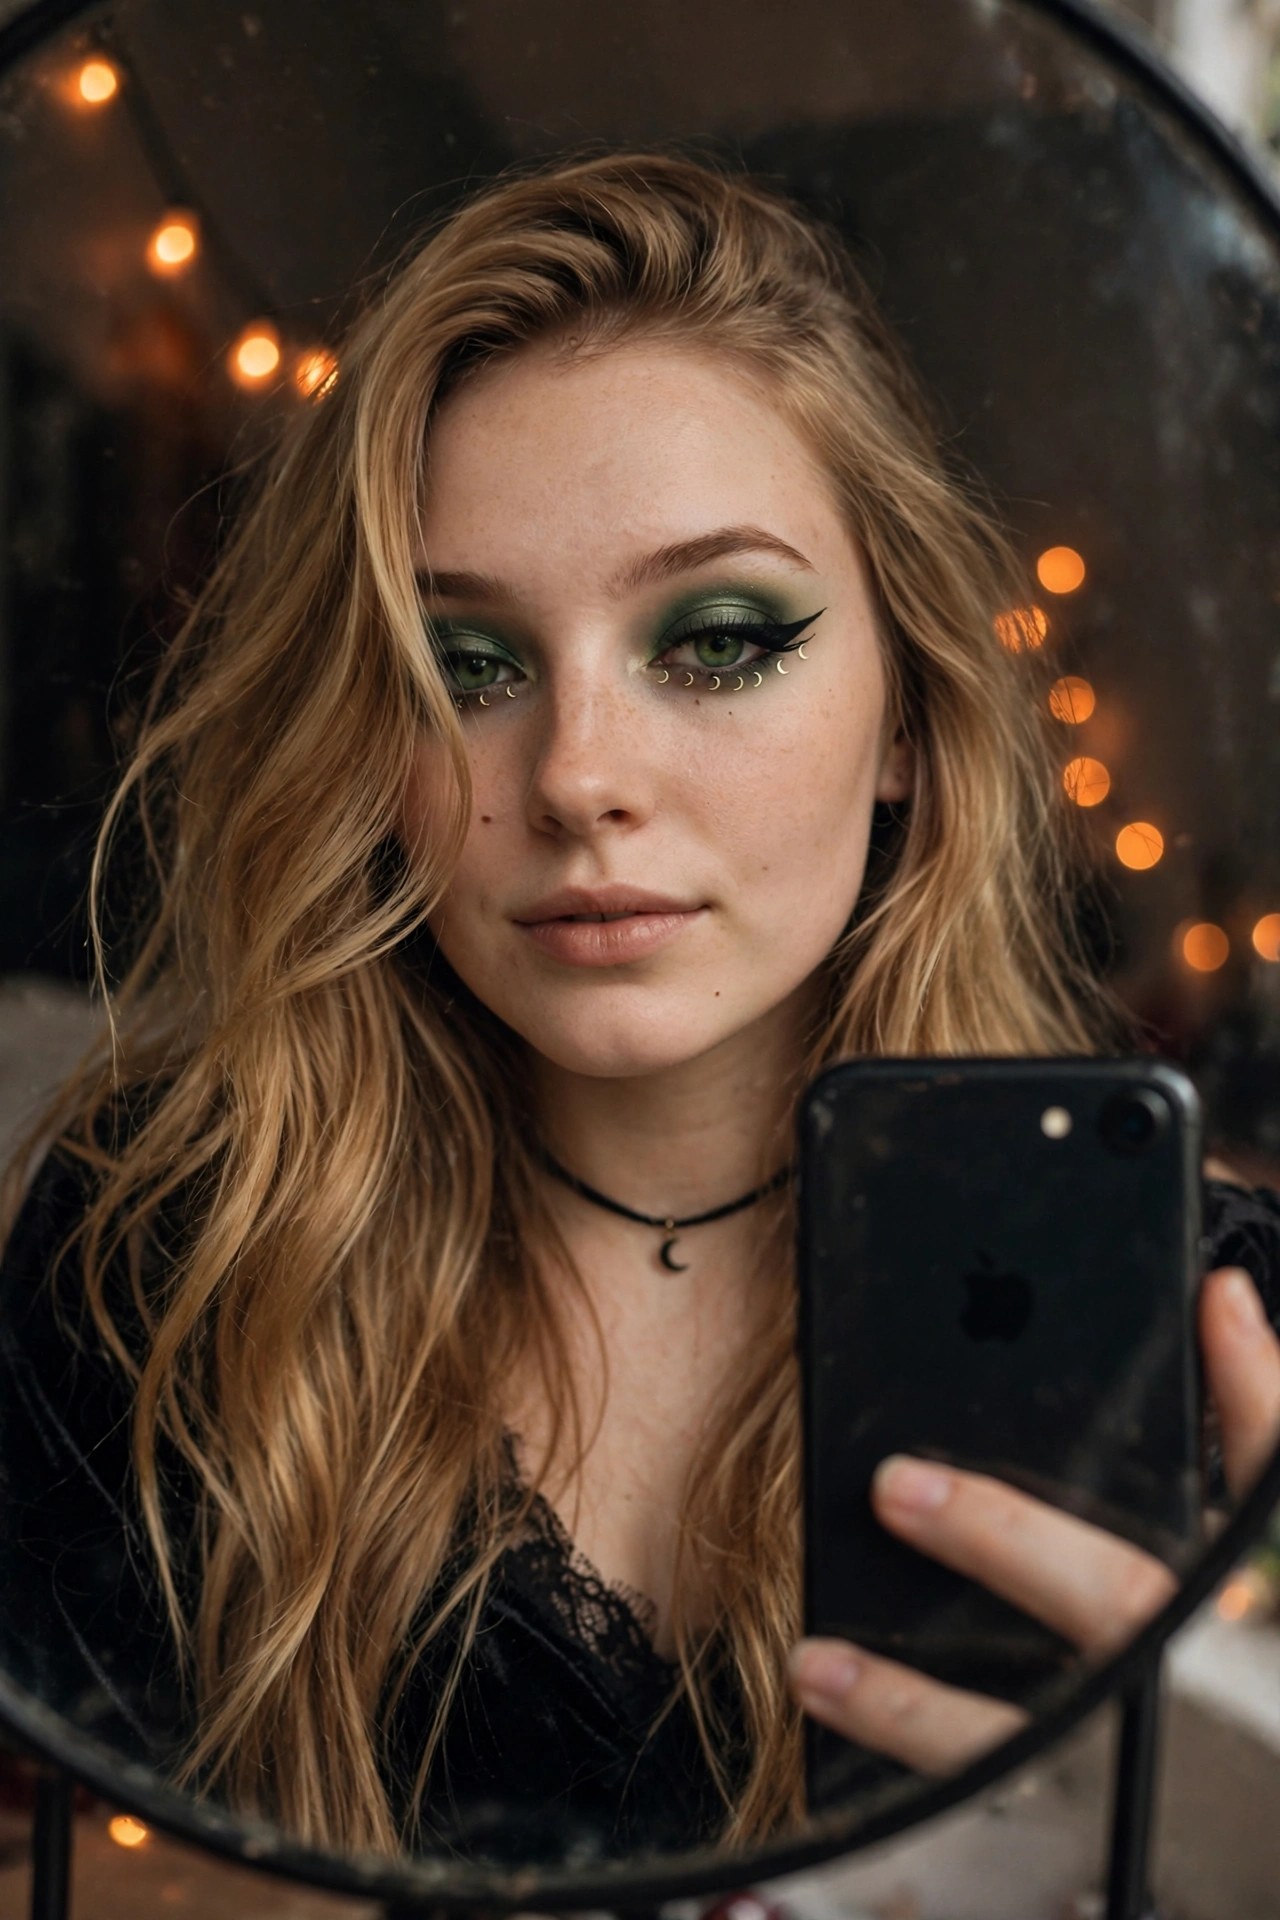
This look caught my attention right away because of how the liner and those little gold moons work together. The green shadow sits in the crease and blends out softly, while the black wing stretches long and sharp. Under the eye she added a row of tiny crescent shapes that follow the curve of the lower lash line, which gives the whole thing a quiet celestial feel without going overboard.
I like how the moons are small and metallic rather than big and glittery. It keeps the focus on the eye shape itself instead of turning into a full face paint situation. The rest of the face stays pretty neutral, so the eye design stands out clearly even in a close mirror shot like this.
If you want something that reads Halloween but still feels wearable for a night out, this is a nice middle ground. The gold accents catch light without needing extra products, and the green shadow can be swapped for other colors if you already have them in your collection.
Sunset Glitter Eye Makeup
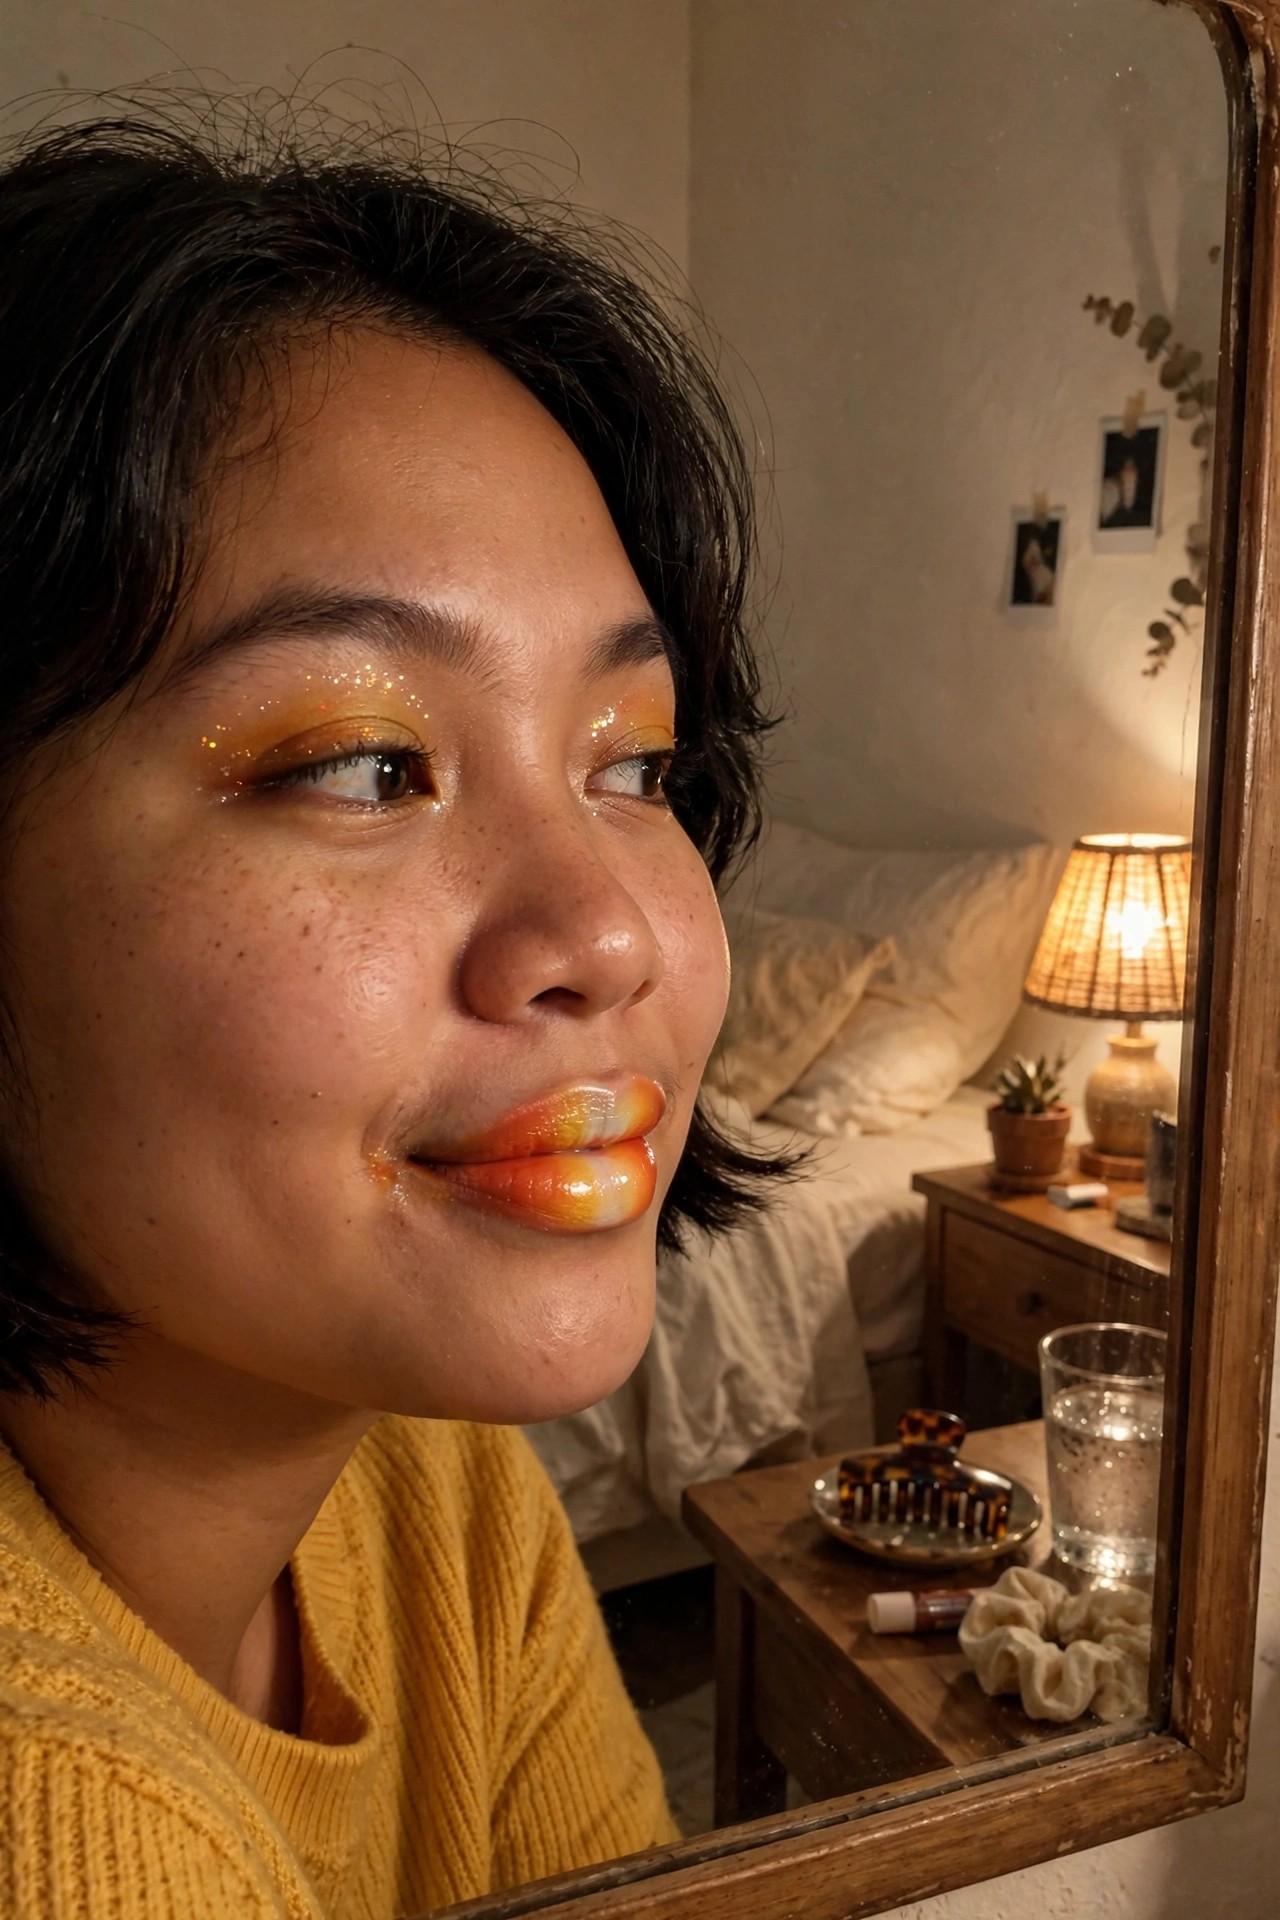
I keep coming back to how the eyeshadow moves from soft yellow into that deeper orange right at the outer corner. The glitter sits right on top without looking messy, and it catches the light every time she turns her head. The lips match the same color story but stay softer with that glossy finish fading toward the center.
It feels like a simple way to wear a full sunset moment without going full graphic liner. The placement stays mostly on the lid so it reads as wearable even if you are not going all out with face paint. I would probably try this with a cream shadow base first so the glitter actually sticks where you want it.
Cracked Mirror Makeup Look
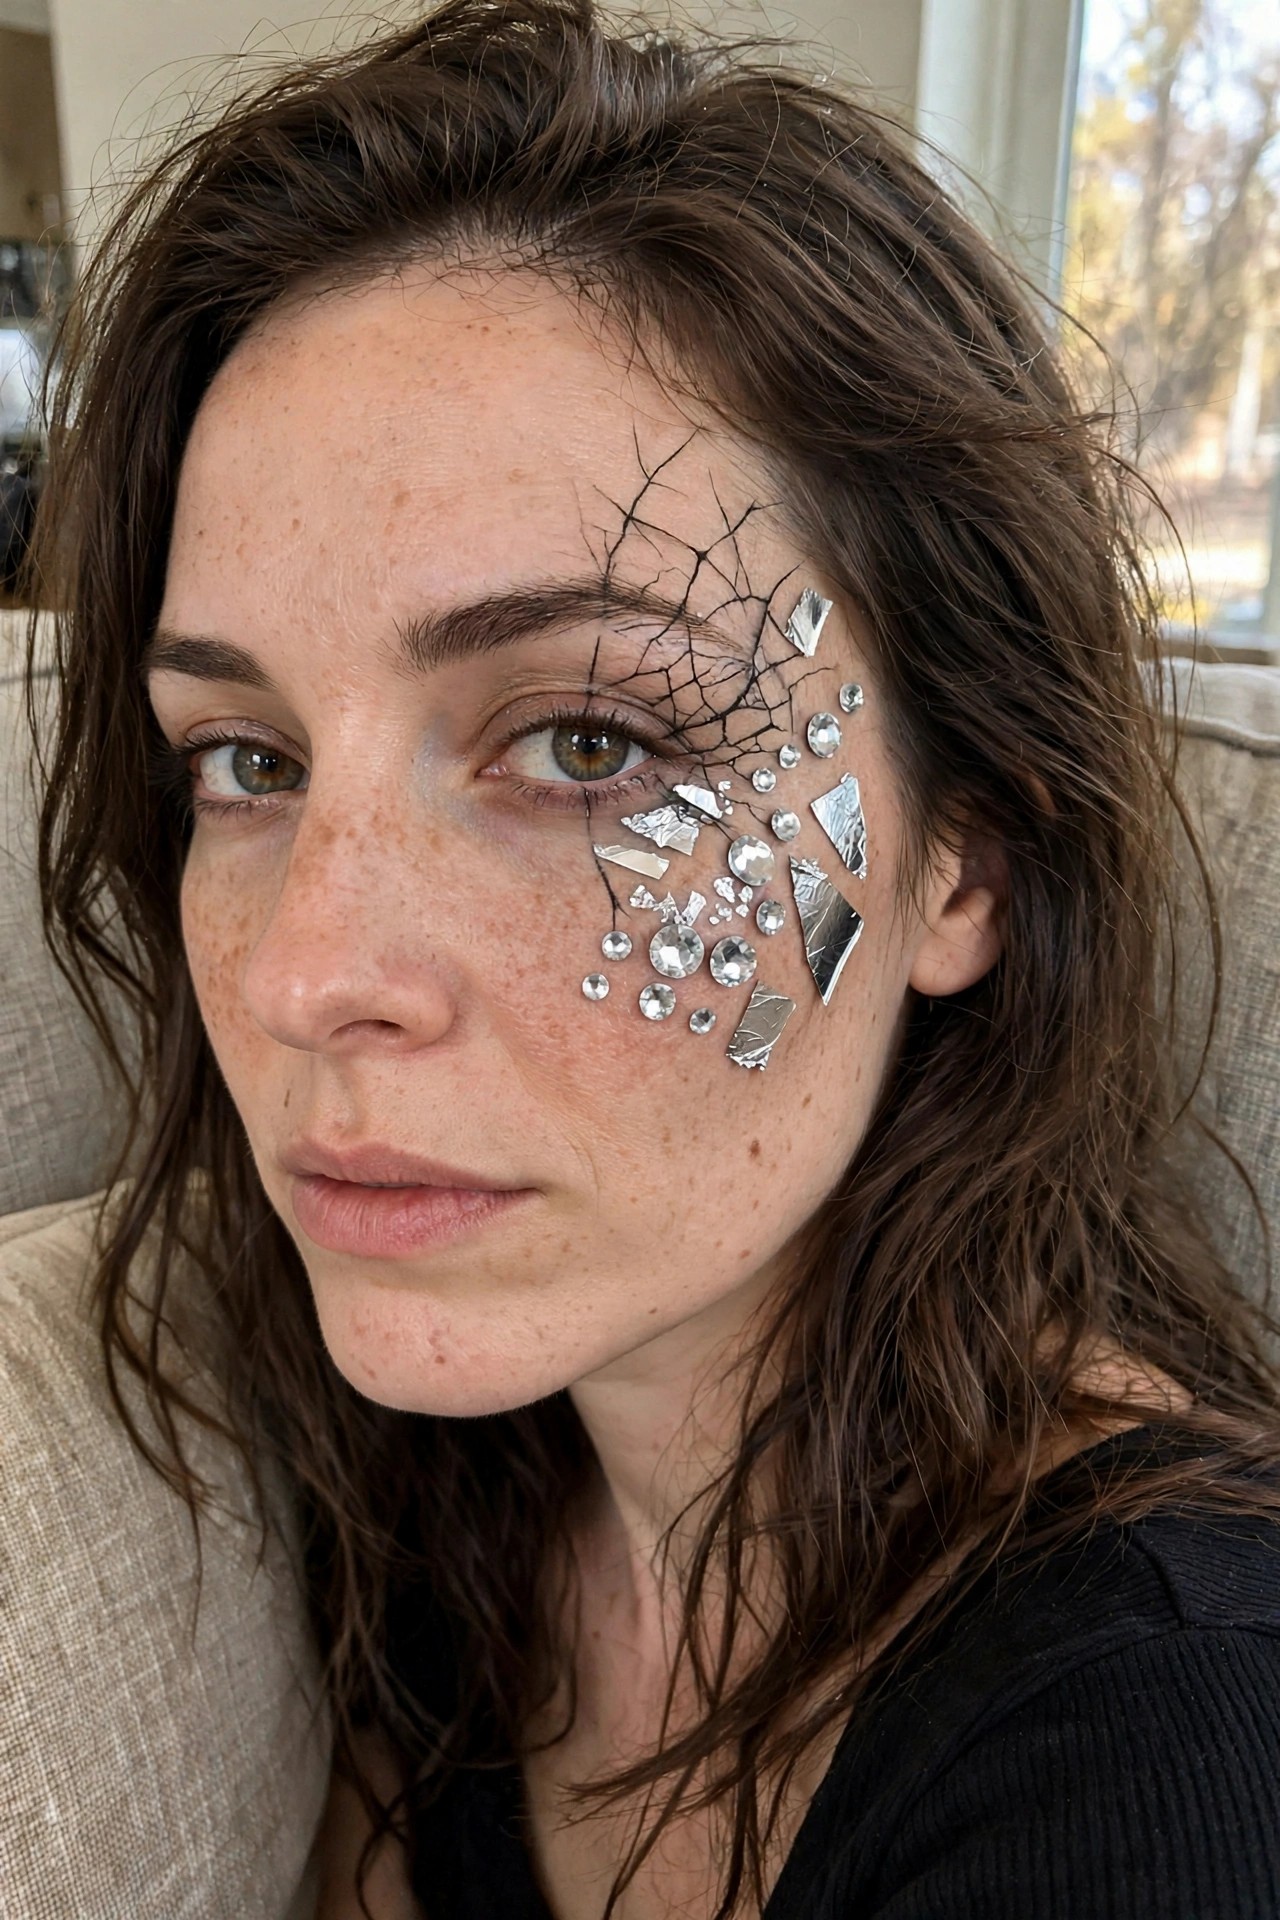
This makeup takes the broken mirror idea and runs with it in a really precise way. Black crack lines fan out across the temple and cheek while silver foil shards and clear rhinestones sit right along the edges so the whole design looks like glass that just shattered. The rhinestones catch light at different angles which makes the effect feel dimensional instead of flat.
I like how the placement stays tight around one eye and cheek instead of covering the whole face. It keeps the look wearable while still reading as a full Halloween statement. The natural freckles and skin texture underneath stop it from feeling too costume heavy.
Glitter Crescent Eye Makeup
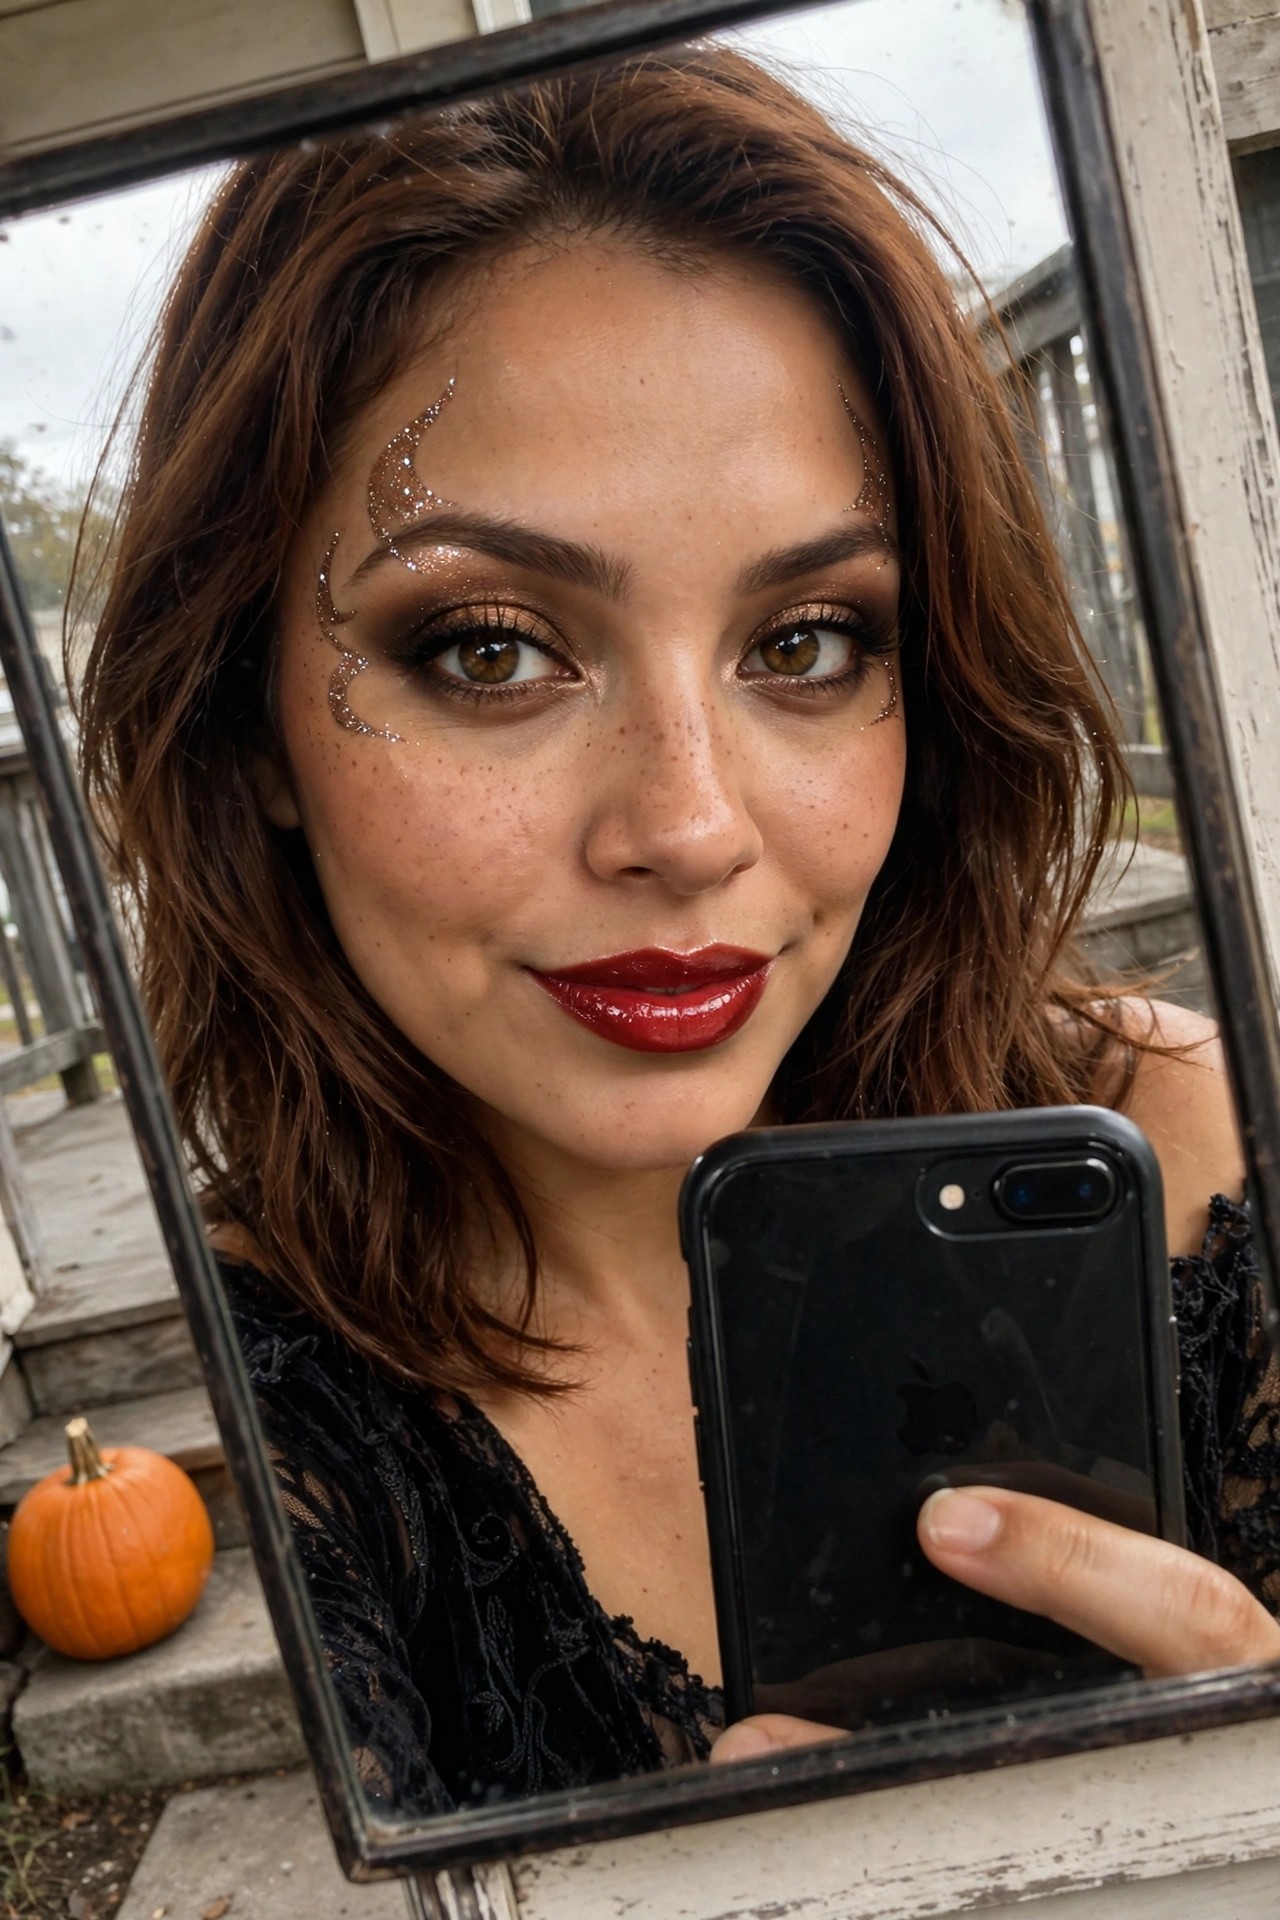
This one caught my eye right away because of those curved gold glitter shapes that sit right above the brows and sweep around the outer corners. They almost look like little metallic horns or crescents without going full fantasy creature. The rest of the eye is kept in deep browns and smoky tones so the glitter stands out instead of competing.
The glossy red lip feels like the right anchor for the whole face. It keeps everything grounded while the glitter does the Halloween work. I like how the design stays symmetrical but still has that slightly uneven, hand-painted feel that makes it look more creative than a stencil.
Dewy Skin Glow Makeup
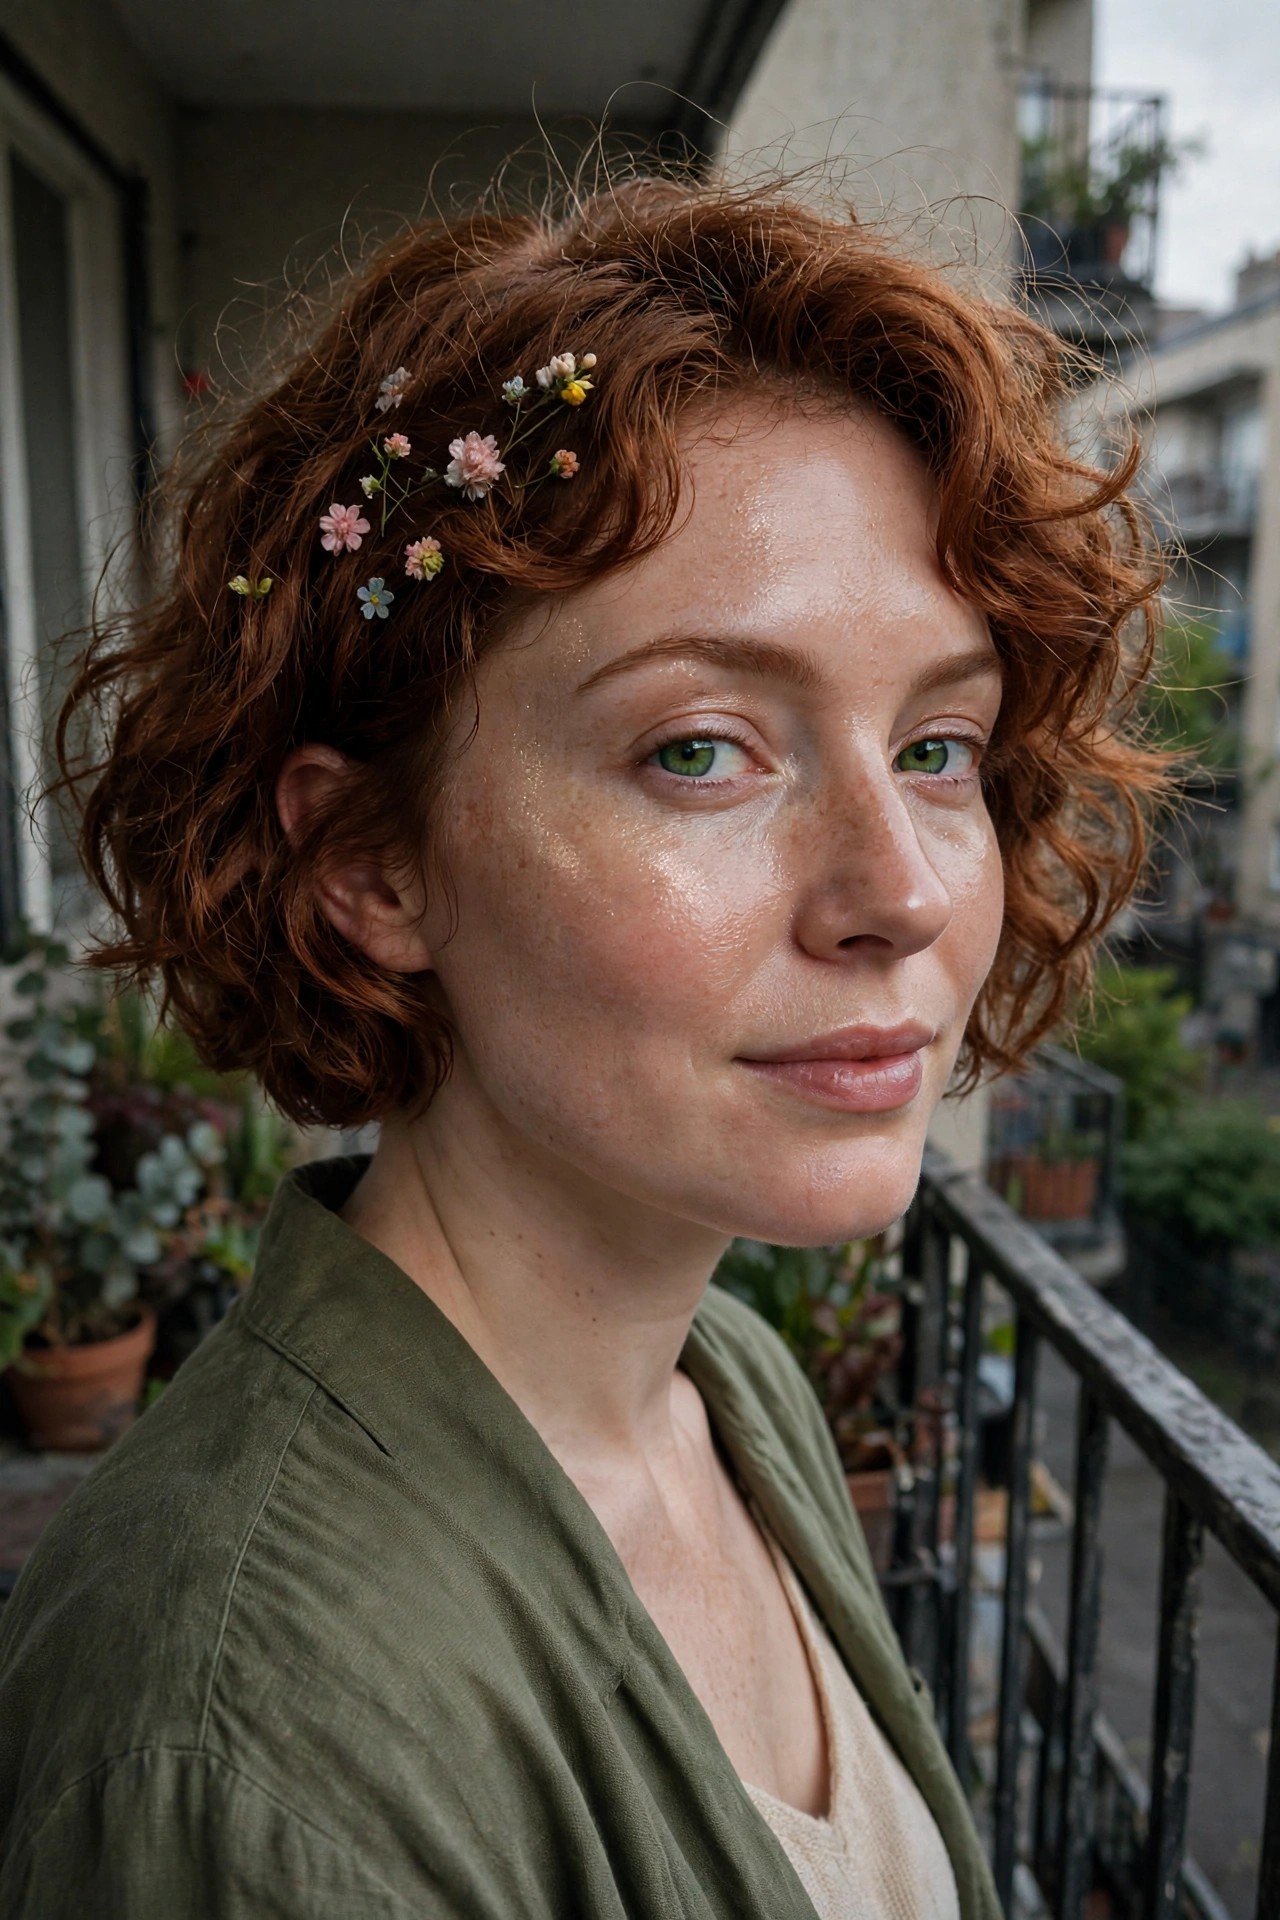
The first thing that stands out is how much light bounces off her skin. It looks like a heavy layer of highlighter or a finishing oil was used to create that wet, almost glassy finish across the cheeks, forehead, and nose. The freckles are left completely uncovered, which keeps the whole thing feeling light instead of masked.
I like how the eyes stay simple with just mascara and a soft brow, letting the skin do the talking. The lips are barely tinted, more of a natural flush than a bold color. It reads as a clean base you could build on with small details like the tiny flowers tucked into the hair if you wanted to push it toward something more whimsical.
For me this feels like one of those low effort ideas that still photographs nicely, especially if you already have clear skin or like the look of freckles showing through. You could easily add a touch of shimmer on the inner corners or a faint wash of color on the lids without changing the main focus.
Pink Circle Cheeks With Black Dripping Eye Makeup

I keep coming back to how simple the shapes are here yet how clearly they read as Halloween. The bright pink circles sit right on the apples of the cheeks with almost no blending at the edges so they look painted on purpose. That contrast alone already feels like a costume even before the eye detail appears.
The black teardrop starts thick at the inner corner of one eye and then thins as it trails down the cheek in a single controlled drip. It is the only dark element on the face so it pulls all the attention without needing extra lines or shading. The rest of the skin stays fairly neutral which makes both the pink and the black stand out even more.
I think this would be easy to recreate if you already own cream blush and a black cream liner or face paint. The placement matters more than perfect symmetry so it still feels wearable rather than overly theatrical.
Emerald Serpent Scale Makeup
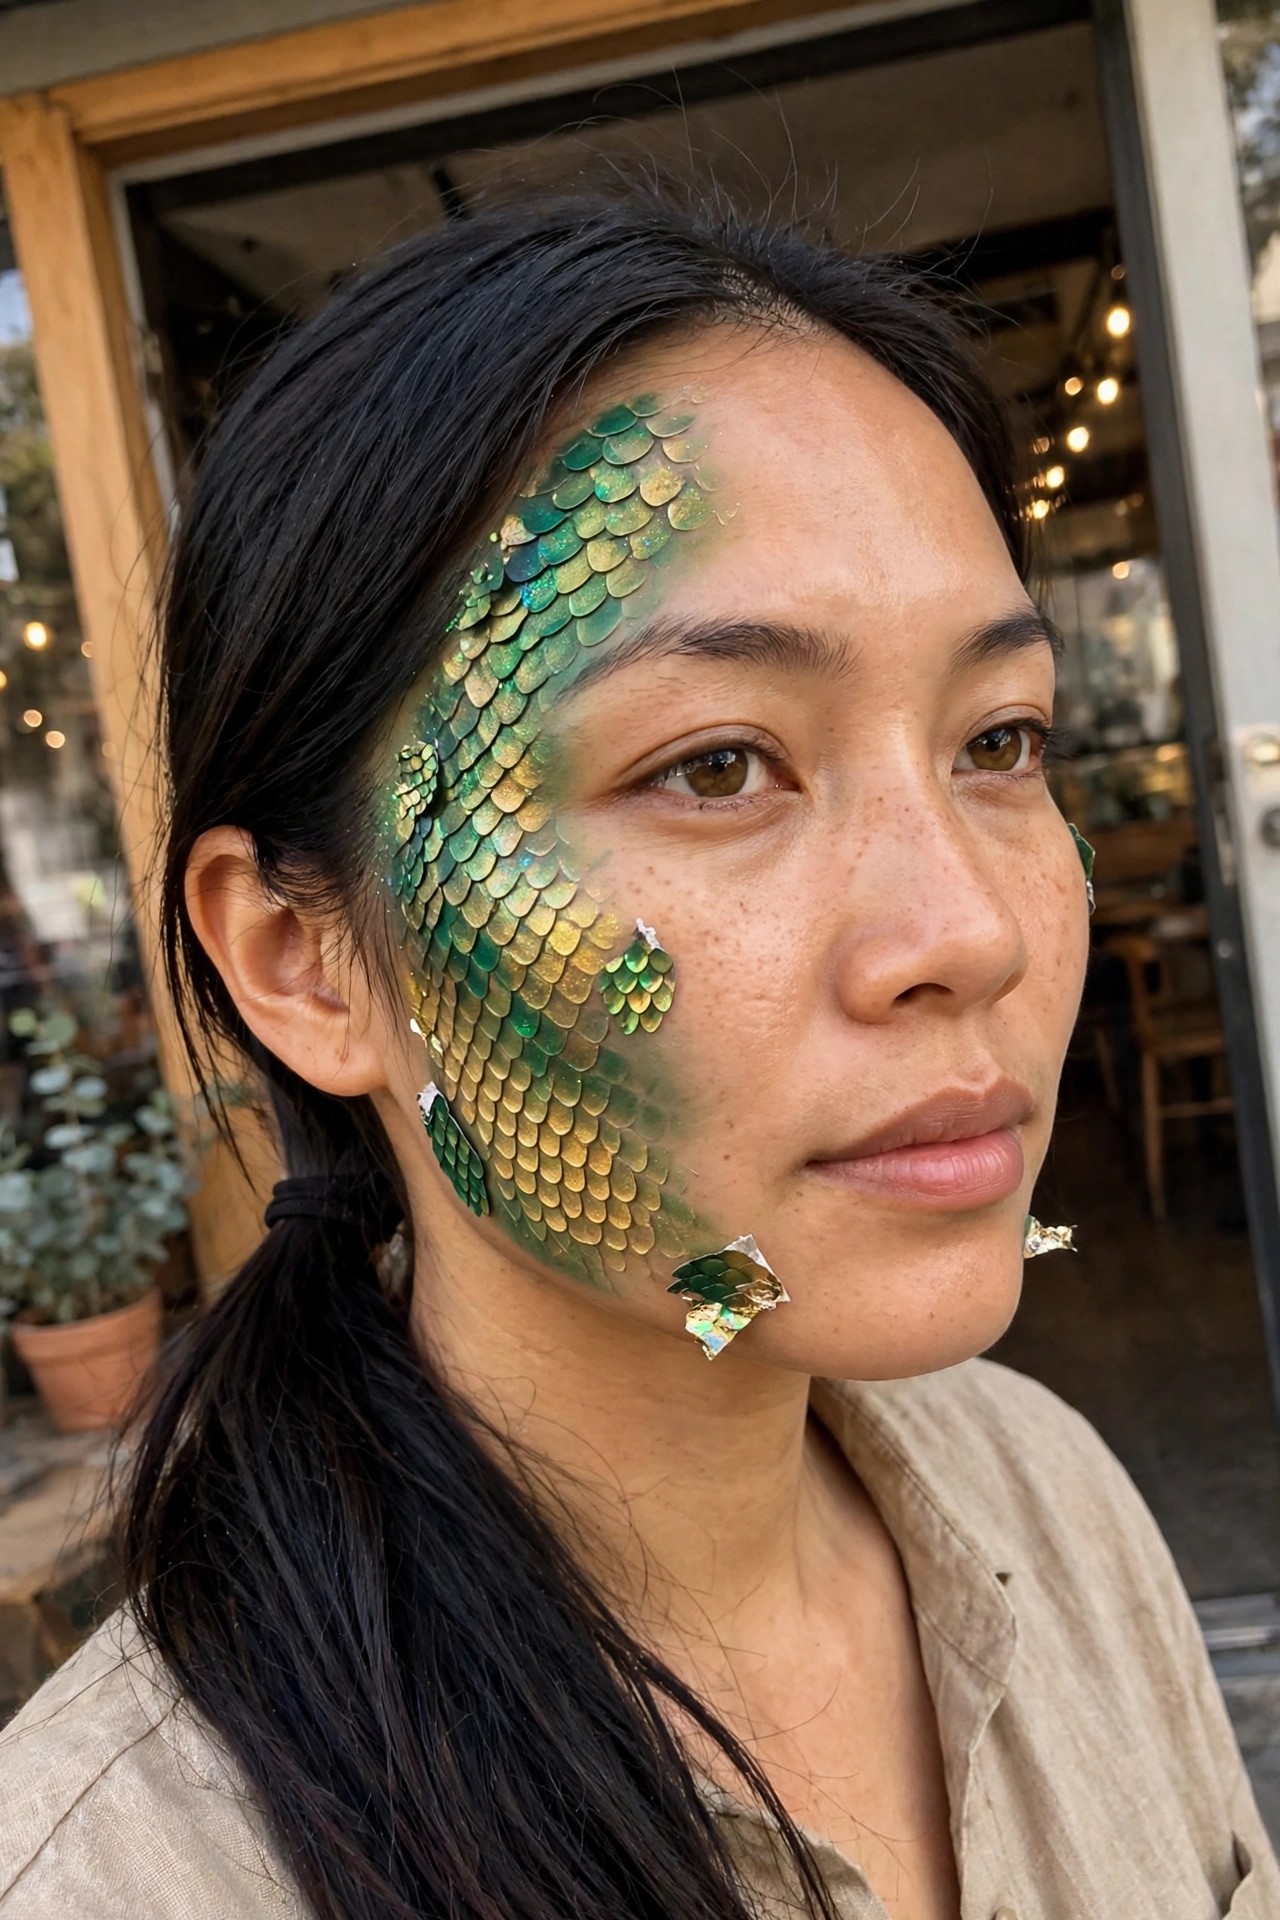
I keep coming back to how this scale pattern sits right across the cheekbone and temple. The green shifts into gold depending on the light and it actually looks like overlapping scales instead of just random dots or lines. A few pieces have lifted away near the jaw and neck which gives it that half-finished shedding effect without looking messy.
What stands out is how the design stays contained to one side of the face. It leaves the other side clean so the eye can rest and the scales read as intentional rather than overwhelming. The color choice feels fresh for a mermaid or serpent idea while still staying wearable enough for someone who does not want full face coverage.
Split Lip And Smoky Eye Makeup

I keep coming back to this one because the split lip feels so simple yet it changes everything. One side is solid black and the other is a deep red that almost reads black in certain light. It creates this clean line right down the middle that makes the whole face look intentional instead of just dramatic.
The eyes are just as heavy but they balance it out. The shadow is built up dark and smoky with almost no gap between the lid and the brow bone. It makes the blue eyes stand out without needing any bright color. I like how the look stays mostly monochrome except for that one red half of the lip. It keeps things from feeling too busy.
What I appreciate is how wearable the idea still feels even though it is bold. You could probably pull the split lip off with a much lighter eye if you wanted something quicker. Or you could lean harder into the eyes and keep the lips simpler. Either way the contrast is what sells it.
Floral Skull Makeup
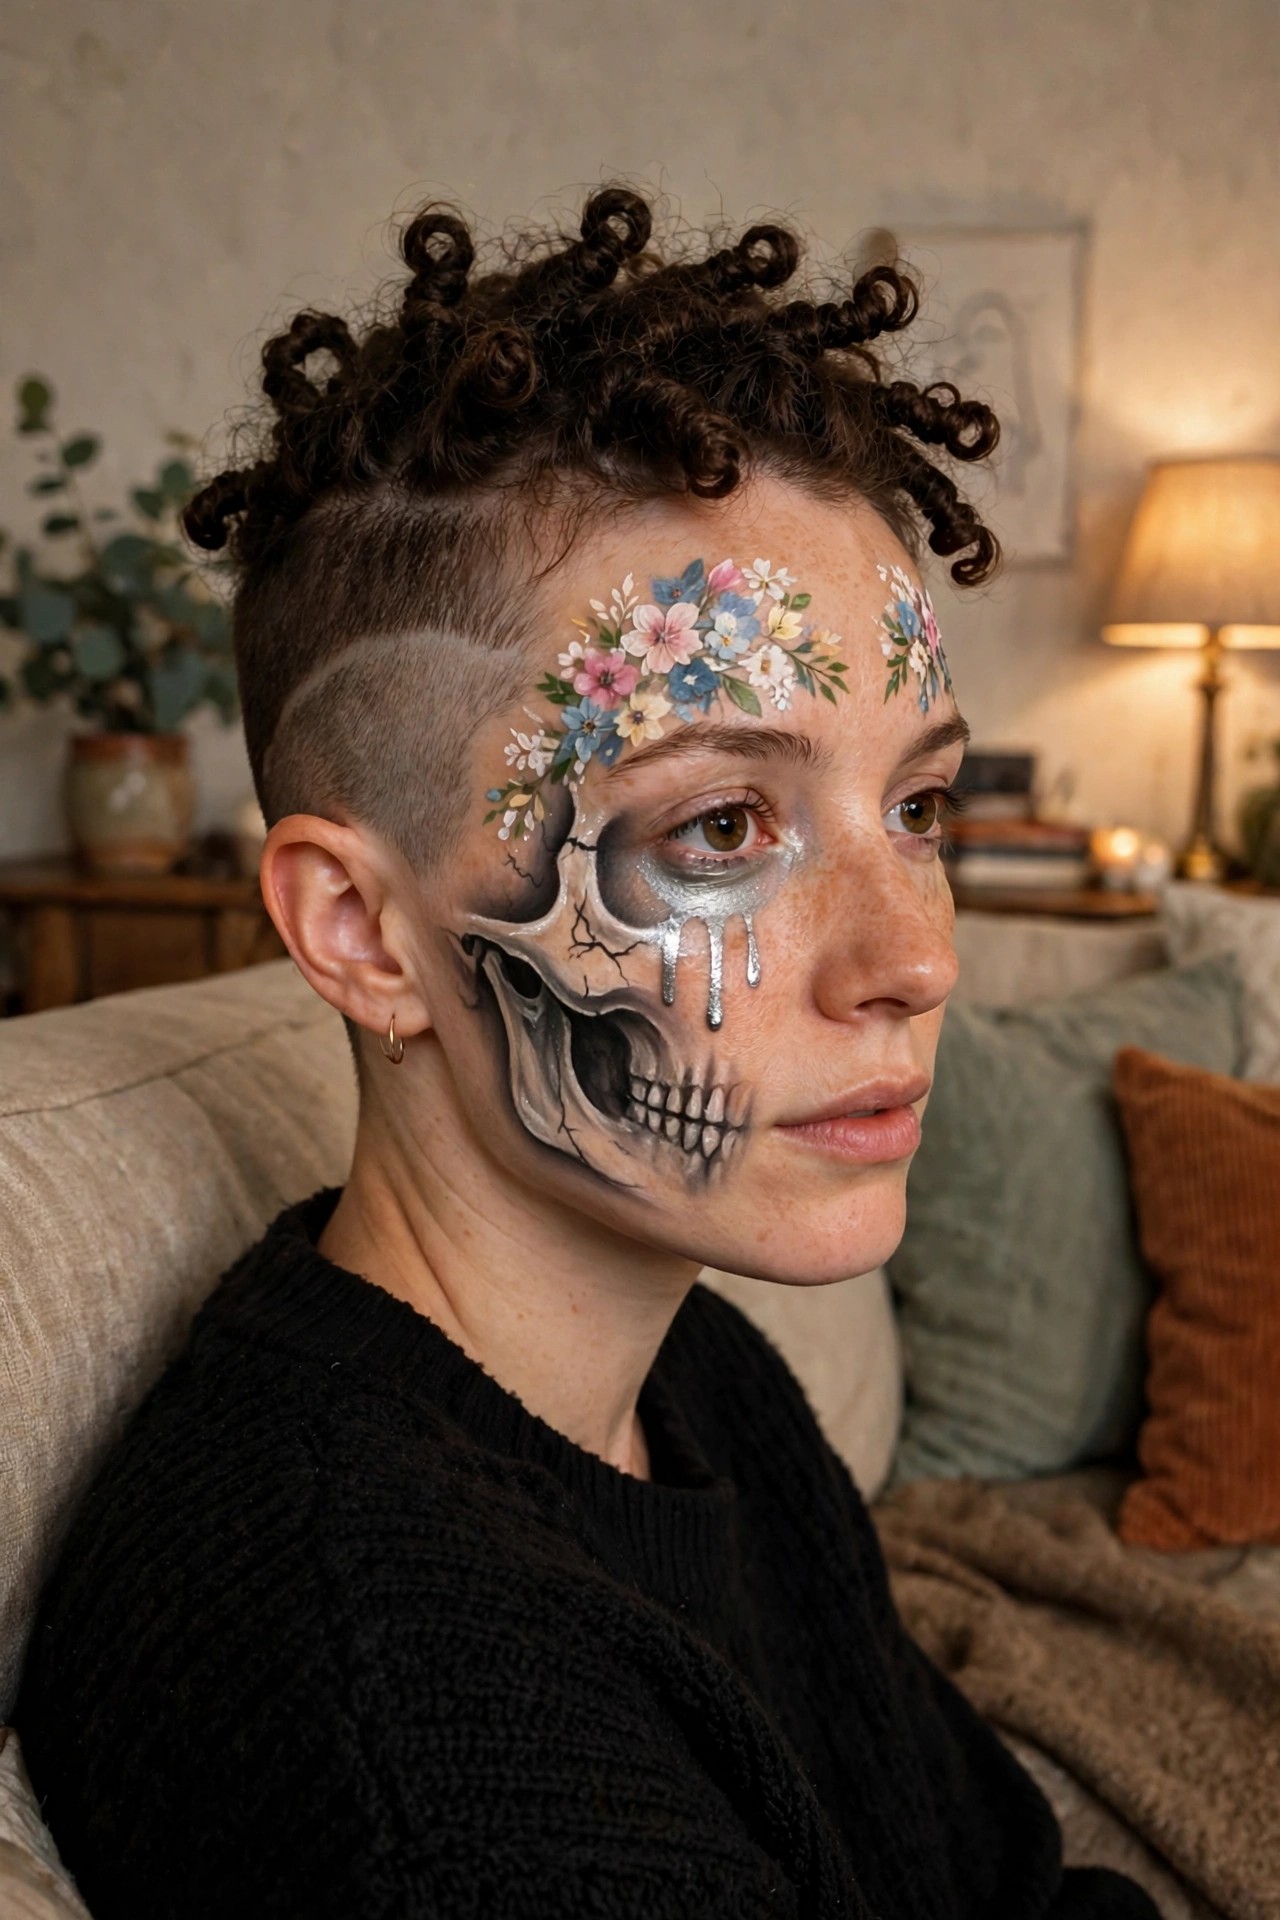
This skull design sits right across the lower half of the face and feels more finished than a quick paint job. The bone structure looks shaded and cracked in places, with the teeth picked out in detail and a few silver drips running down from the eye socket area. Up top the flowers add a softer note, with small pink, blue, and white blooms clustered around the forehead and near the temple.
I like how the metallic silver gives the whole thing a slightly wet, eerie shine without needing extra props. The flowers keep it from reading as purely scary, so it could work for someone who wants something striking but still wearable for a longer night out. The shaved sides make the face paint the clear focus, and the remaining curls sit high enough that they do not compete with the design.
Stitched Neck Makeup Design
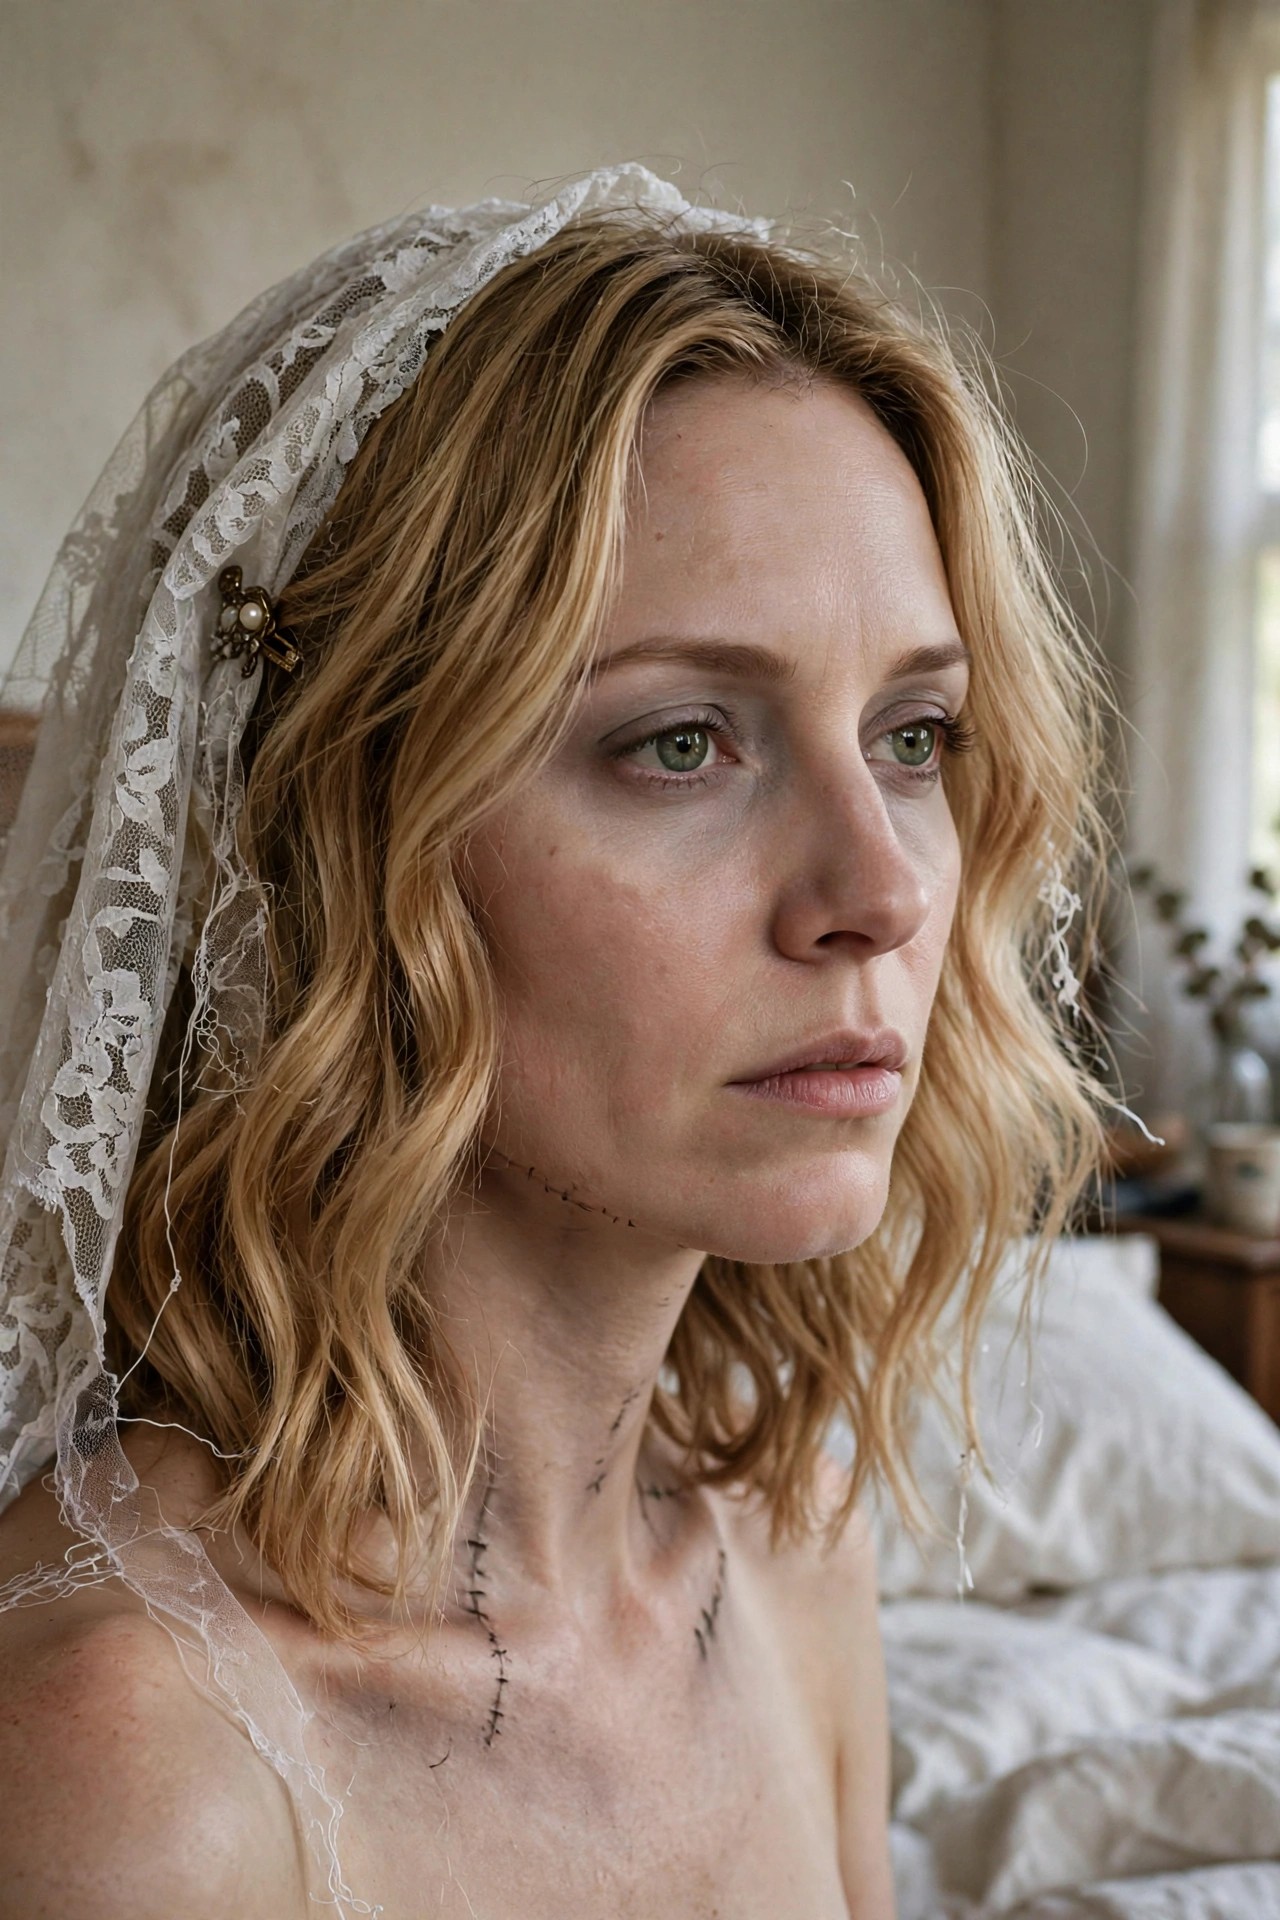
I keep coming back to how those black stitches sit right along the neck and collarbone. They look hand drawn rather than stamped on, with little cross bars that give the whole thing an uneven, just sewn together feel. The pale base makes the lines stand out without needing any extra color, and the slight smudging around the edges keeps it from looking too perfect.
The veil adds a bride element that changes how the stitches read. Instead of a straight monster look, it leans toward something that feels like it was put back together after the fact. The tired eyes and faint shadowing underneath help sell the idea that this face has been through whatever created those seams.
It is simple enough that you could copy the stitches with a fine brush and some black cream makeup, but the placement matters. Keeping them low on the neck and letting a few trail onto the chest makes the effect creepier than if they stopped at the jawline.
Rhinestone Wound Makeup
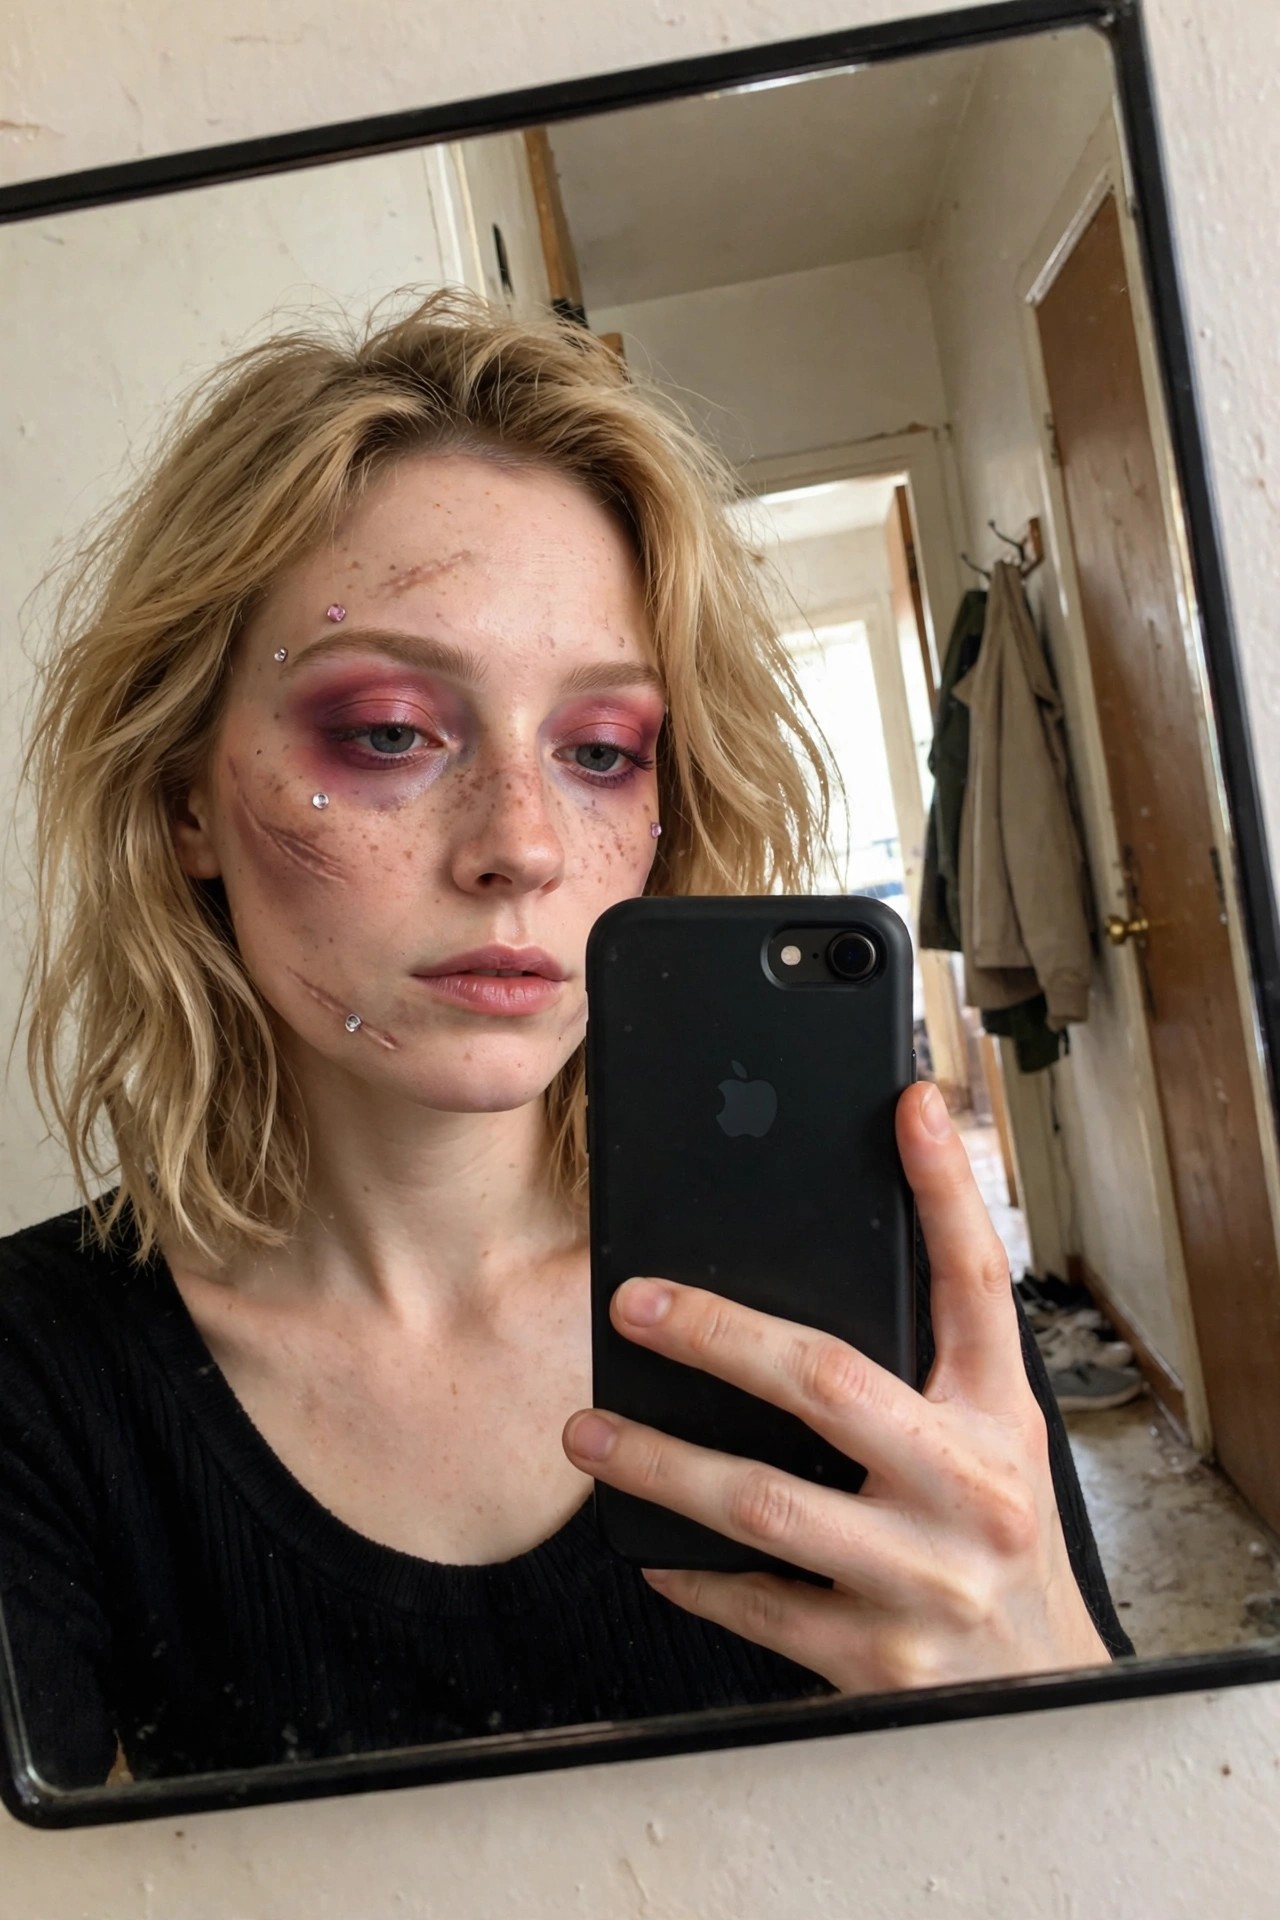
This makeup leans into that half finished injury vibe with clusters of little rhinestones sitting right next to thin red cuts. The eyeshadow stays in a soft pink red range and sits heavy on the lids while the rest of the face keeps a scattered freckle pattern that makes the bruises and lines stand out more. I like how the gems catch the light without turning the whole thing into full glitter overload.
The cuts themselves look drawn on with a fine brush and then filled with a touch of red so they read as fresh. A few of the rhinestones sit directly on the lines which gives the whole design a strange kind of jewelry on wounds effect. It feels wearable enough for a party yet detailed enough that people will stop to look twice.
Frequently Asked Questions
Q: How do I keep my makeup from getting oily and sliding around all night? A: Blot your face lightly with a tissue before you start and use a mattifying primer on your T zone. Touch up with powder every few hours if you need to.
Q: What is the easiest way to remove glitter or heavy face paint later? A: Soak a cotton pad in makeup remover and hold it on the area for a few seconds first. Then wipe gently and wash your face as usual.
Q: Can I try these ideas even if I am not great at makeup yet? A: Start with the ones that use mostly one color or simple shapes. Practice the base steps a couple times before Halloween (it gets easier fast).
